Using Google Maps in your Android Applications – Part 4 [Displaying Information Popups]
android development java google-maps This tutorial was created using the Google Maps API v1 and as it is not possible to obtain a v1 key anymore this series of posts is pretty much obsolete. I’ve been looking at creating an updated set of tutorials and I’ll post them as soon as they are ready.
A little later than hoped and by popular demand (OK, at the time of writing there were only two requests in the comments of the previous part) this is the last part of this mini-series looking at using Google Maps in your Android applications.
In previous parts we have configured our project and displayed a simple map, centered the map on our current location and displayed markers on points of interest. Now we are going to allow the user to tap on one of these markers in order to see additional details about the associated location. If you’ve not been following along with the series then you can download the working source code from here – note that you will need to insert your own Google Maps API key into the main.xml view file.
Assuming that you are all ready to go we’ll jump straight in.
The approach I’m going to use is possible because the MapView class inherits from ViewGroup – i.e. a group of view no less. So all we need to do is to create a view containing our data and display it at the appropriate location on top of the map.
The first thing we are going to need is a suitable image which will form the background to our view. As I’m a developer and not a designer I did a search on OpenClip art and found a suitable speech bubble for this project.
Now we’re not just going to use the image as is, remember that Android supports numerous screen sizes and we need to make sure that they will scale nicely. To that end we are going to make it into a 9-patch image which will allow it to grow/shrink in a manner that will not cause it to look all nasty and stretched. There are a couple of great articles on what a 9-patch image is and how to use the draw9patch utility within the SDK to create one so I’ll not regurgitate that here. Suffice to say that the utility allow you to open up the image and define which areas should stretch and which areas should not.
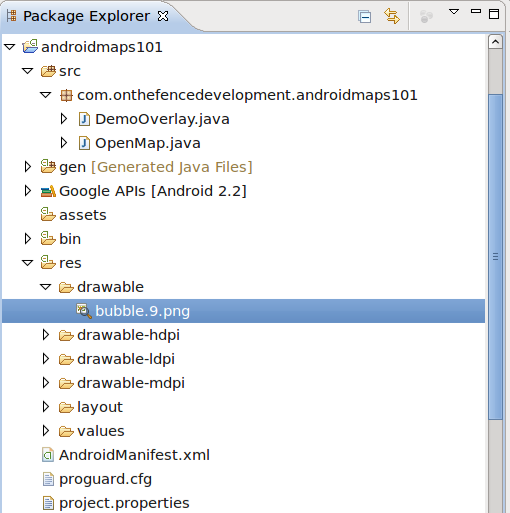
With our 9-patch image created, I’ve named mine bubble.9.png, we need to copy it into the res/drawable folder within our project – create the folder if it is not there already.
Before you head down to the comment section to berate me for not using the density independant folders remember that this is a tutorial for maps, not images 😉
Your project should now look like this.
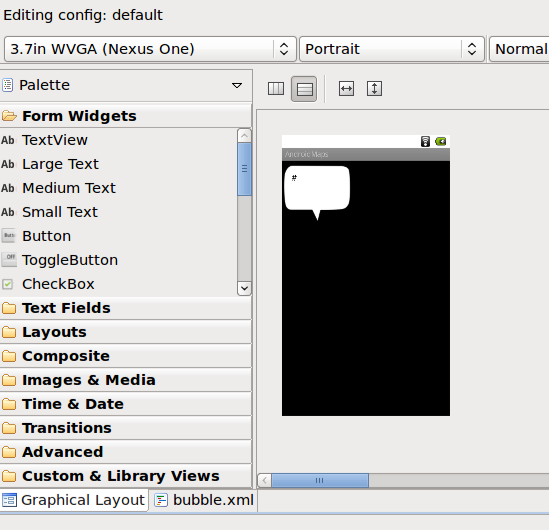
With the image in place we can create our new view. Expand the res/layout folder in the project and add a new file called bubble.xml. When the file opens, switch to the xml view (using the tabs at the bottom of the window) and enter the following xml then save the file.
<?xml version="1.0" encoding="UTF-8"?>
<LinearLayout xmlns:android="http://schemas.android.com/apk/res/android"
    android:id="@+id/infoBubble"
    android:layout_width="wrap_content"
    android:layout_height="wrap_content"
    android:background="@drawable/bubble"
    android:orientation="vertical"
    android:baselineAligned="false" >

<TextView
    android:id="@+id/locationName"
    android:layout_width="fill_parent"
    android:layout_height="wrap_content"
    android:text="#"
    android:textSize="16dip"
    android:textColor="@android:color/black" />

</LinearLayout>
What we’ve done here is to create a simple view using a LinearLayout (where each element is placed after the previous one) and a TextView which will display our content. if you click on the Graphical Layout tab in the designer you will see something that looks like this:
Now is a good time to review what we actually want to achieve here
- If the user taps a marker on the screen then we need to:
- Close any open popups
- Fetch data for tapped location
- Configure the new popup
- Display the popup in the appropriate location
- Center the map on the marker location
- If the user taps the screen but does not hit a marker then we need to:
- Close any open popups
There are a couple of minor tweaks we need to make before we can get started on coding the new functionality. First of all we need to maintain a list of the displayed markers – we only have one in this example but I’m assuming that your application will have a few more 😉 Add the following class variables.
private ArrayList _displayedMarkers;
private LinearLayout _bubbleLayout;
and update the if block on the draw method as follows:
@Override
public void draw(Canvas canvas, MapView mapView, boolean shadow) {

    super.draw(canvas, mapView, shadow);

    Projection projection = mapView.getProjection();

    int latSpan = mapView.getLatitudeSpan();
    int lngSpan = mapView.getLongitudeSpan();
    GeoPoint mapCenter = mapView.getMapCenter();
    int mapLeftGeo = mapCenter.getLongitudeE6() - (lngSpan / 2);
    int mapRightGeo = mapCenter.getLongitudeE6() + (lngSpan / 2);

    int mapTopGeo = mapCenter.getLatitudeE6() - (latSpan / 2);
    int mapBottomGeo = mapCenter.getLatitudeE6() + (latSpan / 2);

    _displayedMarkers = new ArrayList<GeoPoint>();

    GeoPoint geoPoint = this.getSampleLocation();

    if ((geoPoint.getLatitudeE6() > mapTopGeo && geoPoint.getLatitudeE6() < mapBottomGeo)
            && (geoPoint.getLongitudeE6() > mapLeftGeo && geoPoint.getLongitudeE6() < mapRightGeo)) {

        Point myPoint = new Point();
        projection.toPixels(geoPoint, myPoint);

        Bitmap marker = BitmapFactory.decodeResource(mapView.getContext().getResources(), R.drawable.markerblue);

        canvas.drawBitmap(marker, myPoint.x - 15, myPoint.y - 30, null);

        _displayedMarkers.add(geoPoint); // Add this line ....
    }
}
With the list of displayed markers being maintained we can now iterate over them to see if the user has tapped the map somewhere close to one of them. The entry point for our functionality is the onTap event of our overlay so open this file and add the following.
@Override
public boolean onTap(GeoPoint p, MapView mapView) {
    // If a bubble is currently displayed then clear it.
    if(_bubbleLayout != null){
        mapView.removeView(_bubbleLayout);
    }
    if (performHitTest(mapView, p)) {
        // Get instance of the Bubble Layout
        LayoutInflater inflater = (LayoutInflater) mapView.getContext().getSystemService(Context.LAYOUT_INFLATER_SERVICE);
        LinearLayout bubbleLayout = (LinearLayout) inflater.inflate(R.layout.bubble, mapView, false);
    }
    return true;
}
What we are doing here is to close any previous bubbles and then call out to the performHitTest method which we’ll write now. The aim of this method is to compare the location that the user tapped with the currently displayed marker positions. If they are in close proximity then we’ll create a new instance of the bubble view, configure it and display it.
As with all things there are numerous ways to determine whether the user has tapped the screen close enough to a marker to consider it to be a ‘hit’. For the purpose of this example I’m going to ‘draw’ an invisible box around the tapped point and then iterate through the displayed markers to see if their position falls within that area. If it does then it’s a hit, if not then it’s a miss. Obviously this method has some shortcomings, especially when multiple markers fall inside the hit box, but you’ll get the idea.
A basic implementation of this would be as follows:
@Override
public boolean onTap(GeoPoint p, MapView mapView) {

    // If a bubble is currently displayed then clear it..
    if (_bubbleLayout != null) {
        mapView.removeView(_bubbleLayout);
    }

    if (performHitTest(mapView, p)) {

        // Get instance of the Bubble Layout ...
        LayoutInflater inflater = (LayoutInflater) mapView.getContext().getSystemService(Context.LAYOUT_INFLATER_SERVICE);
        _bubbleLayout = (LinearLayout) inflater.inflate(R.layout.bubble, mapView, false);

        // .. configure its layout parameters
        MapView.LayoutParams params = new MapView.LayoutParams(LayoutParams.WRAP_CONTENT, LayoutParams.WRAP_CONTENT, p,
                MapView.LayoutParams.BOTTOM_CENTER);

        _bubbleLayout.setLayoutParams(params);

        // Locate the TextView
        TextView locationNameText = (TextView) _bubbleLayout.findViewById(R.id.locationName);

        // Set the Text
        locationNameText.setText(getSampleText());

        // Add the view to the Map
        mapView.addView(_bubbleLayout);

        // Animate the map to center on the location
        mapView.getController().animateTo(p);
    }
    return true;
};
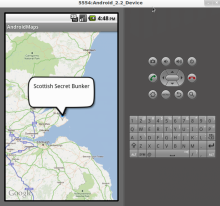
If you run the application now you should see the emulator spin up and display our map with the single location marker in place. Click on the marker and you should (hopefully) see something like this:
While this is a working implementation of the application there are some obvious issues here.
- We have a single, hardcoded location whereas in the real world you will more than likely want to display locations which are stored in a database or accessed via a webservice (or both).
- This can be achieved by updating the draw event in the overlay to fetch the locations and then loop through them, adding those which are visible in the current view of the map.
- We are using basic a GeoPoint for our location but your application would probably require a custom class with latitude/longitude properties. The current performHitTest method only returns true or false if a location is close to the tapped location.
- The performHitTest method would need to be updated to return or set the ‘hit location’ object which will probably contain additional information to be displayed in the bubble.
This is the last part of this mini-series which I hope you have found useful. Please feel free to leave any feedback in the comments and remember that you can download the fully working Eclipse project from here download the fully working Eclipse project from here.
Happy mapping 🙂
Comments
Comments are now closed14 responses
Hello, I’m very happy, that I’ve found Your tutorials including a API-Map to an App. Part one and three works very well. In part four the bubble with the comment does’nt appear, there is only the marker as in part three. I tested it both in emulator and device. Can You please help?
Greetings from Germany
ladyanne
Hi ladyanne – glad you have found these posts useful but sorry that you are having problems with part four.First question is – have you downloaded the sample application? There could well be something I missed out in the post that is in the source code.
In the meantime I’ll review the source and the post to see if I can see what may be missing.
hello i am very thank full to you Part one and three works very well i got good help and again thanks
Hello Dave, I read your series about google maps. Today i have started to search some information for my google maps project. First of all your articles were very good. Thank you for that. I would like to know that, how can i display info about somewhere that user touched. You told in this article but it was getting info from a method. I mean that like in google map in a browser. As you know when you click on an object a bubble opens up that has information about that location. How can i get info directly from Google maps.. Thank you again. I have added your website to my favourites!
Glad you have found the articles useful. As for pulling data directly from Google Maps I think that this should certainly be possible. Google APIs are avaiable for a number of functions, ive used one before to return a collection of motor dealers within a certain radius of a particular location, so it should be possible to do this from and android app using the touch coordinates – it really depends what information you are looking for.(I’m actually on holiday abroad at the moment so have limited internet access but if you let me know how you get on then I may be able to help some more when I return in about a week)
Hi, this is a very helpful tutorial. Many thanks from India!
So can you tell me exactly how can i add more locations to your code to display different type of data for each point? Thanks in advance.
The samaple code above only adds a single GeoPoint to the map but if you needed to add more then you will need a for loop to iterate over a collection of points and maintain the list of those which are to be displayed. In my production code I have the following:
_displayedStations = new ArrayList();
for (station currentStation : _stationLocations) {
GeoPoint point = new GeoPoint((int) currentStation.getLatitude(), (int) currentStation.getLongitude());
if ((point.getLatitudeE6() > mapTopGeo && point.getLatitudeE6() mapLeftGeo && point.getLongitudeE6() < mapRightGeo)) {
Point myPoint = new Point();
projection.toPixels(point, myPoint);
Bitmap stationMarker = BitmapFactory.decodeResource(_context.getResources(), _defaultMarker);
canvas.drawBitmap(stationMarker, myPoint.x – 13, myPoint.y – 30, null);
_displayedStations.add(currentStation);
}
}
Where _stationLocations is an ArrayList containing all of the GeoPoints in the local database.
I hope this helps but feel free to post again if you need any more help.
so how do i display different type of data for each point please reply
What sort of data are you trying to display?
thanx a lot from turkey … its very helpful
thnkssssssss budy
Hi, I would like to ask how the bubble message will be show when tap a marker on a map and not ne shown in the specific location you gave. Thanks a lot!
Not sure I’m with you – what are you trying to do..?