Using Google Maps in your Android Applications – Part 1
android development java google-maps This tutorial was created using the Google Maps API v1 and as it is not possible to obtain a v1 key anymore this series of posts is pretty much obsolete. I’ve been looking at creating an updated set of tutorials and I’ll post them as soon as they are ready.
I’m currently working on an Android application which displays points of interest on a map and allows the user to see additional details by tapping on the associated marker. This sounds like a straight forward requirement for an Android application and so you would have thought that there would be a wealth of resources on the web to guide a developer on his way – but that’s not been my experience. While there are resources out there for the basics of how to get a map to display in your application, unless you really know what you are looking for it is quite difficult to find what you are looking for (at least that’s been my experience). Some blog posts include some code but I’ve not found any in the context of a full project – while it my be obvious to someone where the code should go it’s not always obvious to the reader.
This mini-series of posts will (hopefully) show you how to not only include a map but also how to display markers/pins at specific locations and display an information popup when the user taps on one of them. It’s the last part that really caused me some problems and now that I have a working solution I can pass it on.
In this first installment I’ll cover the basics, i.e. how to set up your solution and add code to display a simple map. I’ll also attach the sample, fully working code which will be the starting point for Part 2 of the mini-series.
The first thing that you will need is a Google Maps API key – this will allow your application to download and display the map images (or tiles as they are known).
You’ll need a Google account to request a key but if you are working with Android then I presume this will not be an issue. To request your key go to http://code.google.com/android/maps-api-signup.html and follow the instructions. Store your key somewhere safe because as far as I can tell there is now way to view it without generating it again (which I find odd but there you go).
Armed with your API key you can now start to create your solution. I’m running Eclipse 3.6 (Helios) with the Android tools etc installed.
I’ve previously blogged about how I configured my system so if you need any assistance with this then take a look.
With Eclipse running, create your new project by selecting File > New > Project. In the resulting ‘Select a Wizard’ dialog, expand the Android node and select Android Application, then click Next. This will open up the ‘New Android Project’ dialog as below:
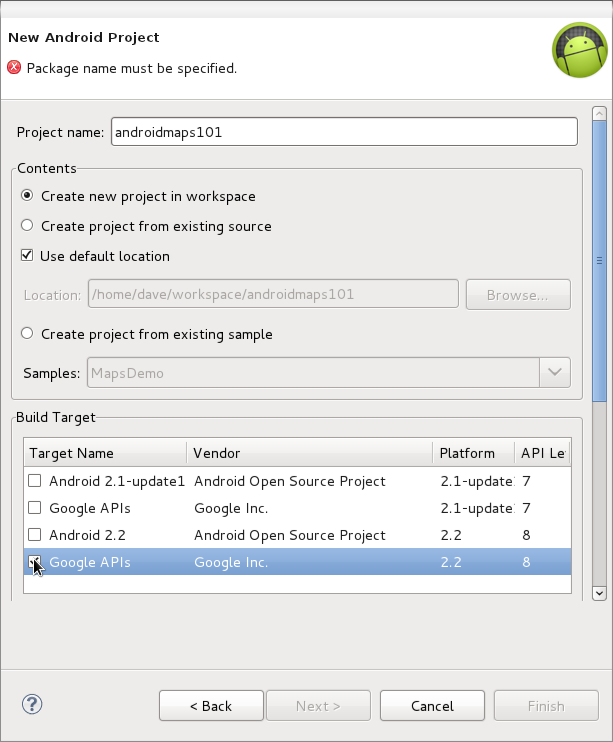
Here I have named the project ‘androidmaps101’, specified the project location as being the default workspace and selected my build target as being Google APIs version 2.2. It is important to use the Google APIs version otherwise the mapping functionality will not work. If you want to target a different overall version of Android, e.g. 2.1, then simply download and select the appropriate Google APIs version (note that I only have versions 2.1 and 2.2 installed on my system at the moment).
In the bottom half of the dialog I’ve specified the Application Name as AndroidMaps, provided a suitable package name and specified the minimum SDK version as 8 (to match that of the Google API build target I specified above). I’ve also specified that an activity of OpenMap be created as part of the project – we’ll see where all these settings end up in a minute.

At this point you can click Finish to kickoff the wizard (clicking Next will let you create a Test project but we’ll not need that for this mini-series).
Once the wizard has finished, open your Package Explorer and you’ll see the newly created project called ‘androidmaps101’. Expand this to display the package which can be expanded to display our initial activity – called ‘OpenMap’.

Before we dig into the code we need to make a few tweaks to the project settings, in particular we need to ensure that we include a reference to the Google maps library and add a permission setting to allow access to the Internet in order to download the maps.
In the root folder of the new project is a file called AndroidManifest.xmlwhich contains our project properties. Double-click to open this file and it will open in multi-tabbed interface as below:
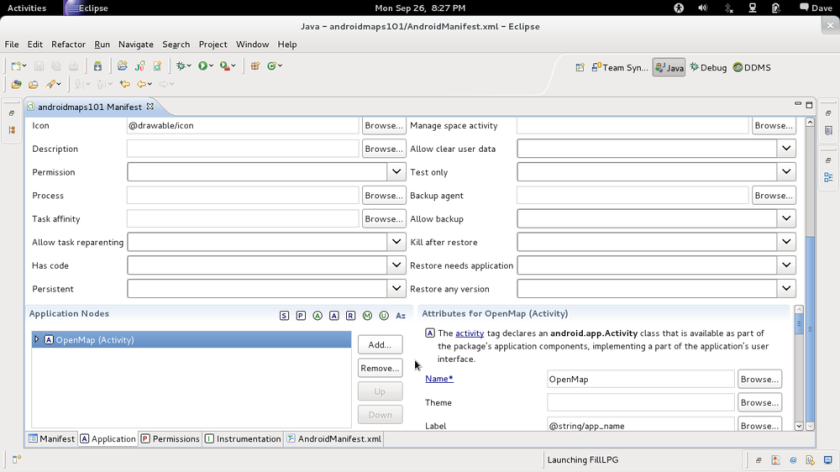
- Click on the ‘Application‘ tab and scroll to the bottom of the screen until you see the Application Nodes section.
- Click the Add button and then select ‘Uses Library‘ in the resulting dialog and click OK – you should now see an new value ‘Uses Library‘ in the Application Nodes list.
- Make sure this is selected and then click on the ‘Name‘ drop-down list to the right of the screen.
- Select ‘com.google.android.maps‘ from this list and set the ‘Required‘ drop-down to true.
That’s the library sorted, now for the Internet permission.
- Select the ‘Permissions‘ tab and click the ‘Add‘ button.
- Select ‘Uses Permission‘ from the resulting dialog and click OK. With this selected click on the ‘Name‘ drop-down list
- Select‘android.permission.INTERNET‘
If you want to see what this has done to the underlying XML in the file then click on the AndroidManifest.xml tab and you should be able to see where these changes have been applied – the file is pretty small at this stage.
Now for the code. Double-click on the OpenMap file to open it in the code window and you’ll see that the wizard has generated some skeleton code – which will actually run but the results are not all that inspiring.
package com.onthefencedevelopment.androidmaps101;

import android.app.Activity;
import android.os.Bundle;
 public class OpenMap extends Activity {
    /** Called when the activity is first created. */
    @Override
    public void onCreate(Bundle savedInstanceState) {
        super.onCreate(savedInstanceState);
        setContentView(R.layout.main);
    }
}
We need to make some changes to this code to enable mapping so do the following:
- Update the class definition so that it extends MapActivity rather than just Activity.
- If you are using Eclipse it will now display some red squiggles under this new code indicating a problem.
- Hover over the mouse over the squiggle and wait for Eclipse to display it’s info window detailing the problem and suggested solutions.
- This problem is that we have not imported the MapActivity namespace so select the option to do so and move onto the the next problem.
- Eclipse should now display another squiggle under the class name OpenMap. Again, hover the mouse over the squiggle and Eclipse will display the problem and list of solutions.
- This issue it due to the fact that any class that extends MapActivity must implement the ‘IsRouteDisplayed’ method. Eclipse provides a solution of ‘Add Unimplemented Methods’ so click on that and the default method stub will be added which just returns a boolean value of false. This is fine for our purposes.
Your code should now look like this (note that I have also removed the import statement for Activity which we no longer need).
package com.onthefencedevelopment.androidmaps101;

import com.google.android.maps.MapActivity;

import android.os.Bundle;

public class OpenMap extends MapActivity {

    /** Called when the activity is first created. */
    @Override
    public void onCreate(Bundle savedInstanceState) {
        super.onCreate(savedInstanceState);
        setContentView(R.layout.main);

   }

   @Override
   protected boolean isRouteDisplayed() {
       // TODO Auto-generated method stub
       return false;
   }
}
Believe it or not, this is all the code we need in here for the moment – but we are not quite done yet. When this code runs the OnCreate method will be called and this simply displays a view called main. So we need to update this view to display a map.
To open the view, expand the projects res folder followed by the layout folder. In here you’ll find a file called main.xml. Double-click on this file to open it.
Chances are that it will open in a graphical editor as below:
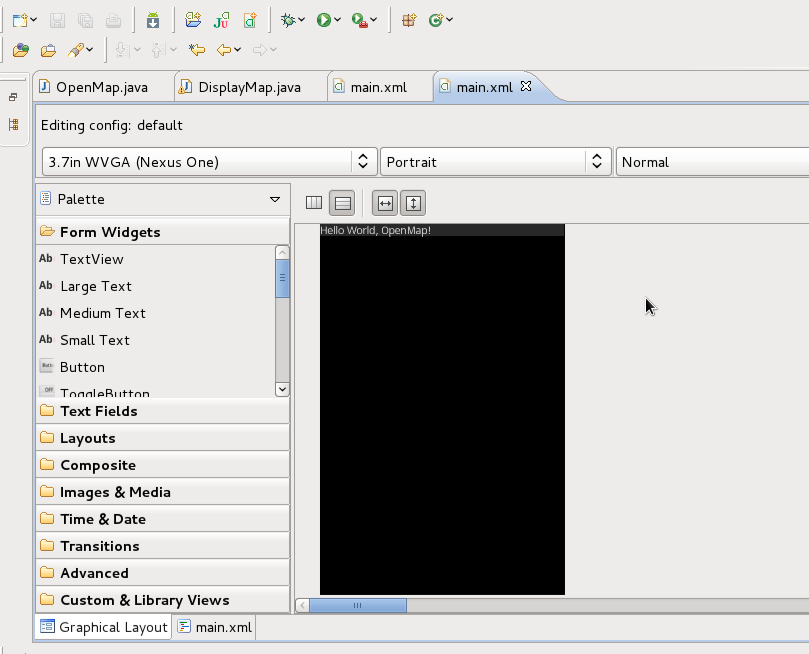
Currently the view just displays the good old ‘Hello World’ text – I told you it was uninspiring. We are going to remove all of this and replace it to display our map.
At the bottom of the screen there are two tabs, Graphical Layout and main.xml. This allows you to flick between the graphical and raw XML views. For this exercise we’ll drop into the XML to make our updates so click on the main.xml tab.
Replace the entire file content with the following code:
<?xml version="1.0" encoding="utf-8"?>
<RelativeLayout xmlns:android="http://schemas.android.com/apk/res/android"
    android:layout_width="fill_parent"
    android:layout_height="fill_parent">

    <com.google.android.maps.MapView
        android:id="@+id/map_view"
        android:layout_width="fill_parent"
        android:layout_height="fill_parent"
        android:enabled="true"
        android:clickable="true"
        android:apiKey="ADD YOUR API KEY HERE"
        />

    <LinearLayout android:id="@+id/zoom"
        android:layout_width="wrap_content"
        android:layout_height="wrap_content"
        android:layout_alignParentBottom="true"
        android:layout_centerHorizontal="true"
        />

</RelativeLayout>
Without going into too much detail here, we’ve created a RelativeLayout which will fill the screen. This contains a MapView component called map_view (which will fill the above layout) and a LinearLayout called zoom which will contain the Zoom In/Out controls (which is ‘docked’ to the bottom of the main layout).
You will now need the API key you created at the start of this post and insert it into the apiKey element.
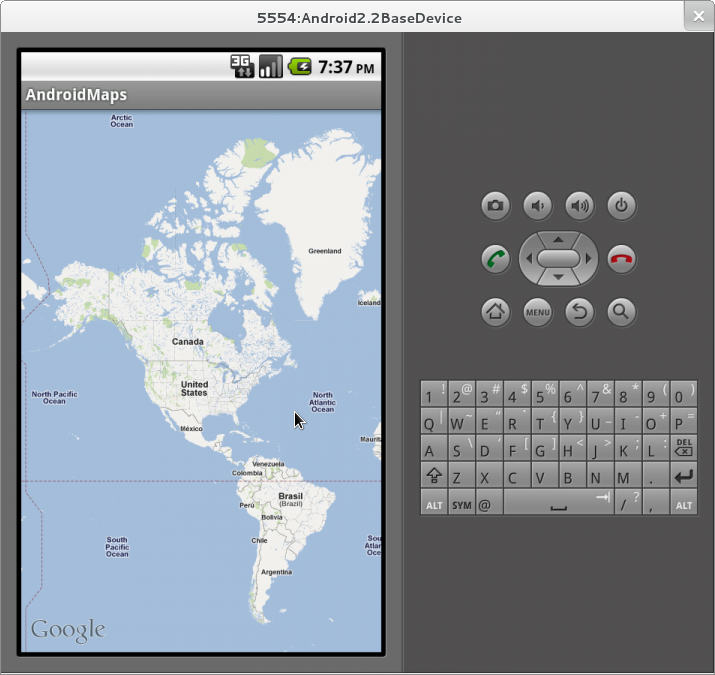
If you now flick back to the graphical view you’ll see that the result is still not that inspiring – if you were expecting a map to be displayed then you will be disappointed, but I have a cure for that. Presuming that you have a suitable AVD (an emulator configuration) you should now be able to hit F11 and run your application in debug mode. After the emulator has started up (it can take a few minutes to start from cold but be patient) you should see the application running and, by default, displaying a map centered on the United States.
As it stands you can move the map around but can’t zoom in or out – but a few lines of code will sort that out.
Back in Eclipse, go to the OpenMap file and enter the update it as below.
package com.onthefencedevelopment.androidmaps101;

import android.os.Bundle;
import com.google.android.maps.MapView;

// Add the following three import statements
import com.google.android.maps.GeoPoint;
import com.google.android.maps.MapActivity;
import com.google.android.maps.MapController;

public class OpenMap extends MapActivity {

    private MapController mapController;  // Add this line

    /** Called when the activity is first created. */
    @Override
    public void onCreate(Bundle savedInstanceState) {
        super.onCreate(savedInstanceState);
        setContentView(R.layout.main);

        // Add the following ----------------------------------------------

        // Get Mapping Controllers etc
        MapView mapView = (MapView) findViewById(R.id.map_view);
        mapController = mapView.getController();

        // Centre on Exmouth
        mapController.setCenter(new GeoPoint((int) (50.634955 * 1E6),
                                                  (int) (-3.409753 * 1E6)));
        mapController.setZoom(11);
        mapView.setBuiltInZoomControls(true);

        // ----------------------------------------------------------------
    }

    @Override
    protected boolean isRouteDisplayed() {
        // TODO Auto-generated method stub
        return false;
    }
}
Rerun the application and not only is the map now centered on Exmouth (my home town) but also zoomed in quite a bit more than before. Also, if you click on the map you’ll see that the zoom controls now appear – fading out after a few seconds.
So there we have it, we’ve written less than 100 lines of code and have a working base for our maps application.
In Part 2 we’ll add the ability to display markers (or pins) on the map to indicate some points of interest. Where we get this data from is entirely up to us – as long as we have latitude and longitude values we can stick a pin on the map.
If you’ve had any problems following along (or if I’ve missed something when writing this up) then I’ve uploaded the Eclipse project for you to download here.
Please feel free to leave a comment if you think I could improve this post – I’m not so proud that I can’t take it 😉
Comments
Comments are now closed18 responses
A very well written blog Dave… simple succinct and not missing the little details which most people tend to. I will await the rest of the series with interest as I have a project lined up for the end of this year, start of next for which this is a candidate tech.
Thanks Conrad – I hope your project goes well.
Thanks for the post Dave. Easy explanation and simple to comprehend. If you are looking to integrate other features with your apps try Quickblox.com
well written ..dave …but im working behind a corporate firewall/behind a proxy…and my map app made following the above instructions only shows a grid view without map..the zoom function works. there’s no problem with the api key..
the logcat shows me error…
couldn’t get connection factory client..which seems to an api bug..
and publisher closed input channel or error occurred..
any help would be appreciated……im stuck with this problem for days and cant find a solution….besides that i have also ..tried running the app on different
platforms…like 2.2,11,14,in the all the above net works..through the settings on emulator ….but not the app
Hi Eshan – I’m fortunate not to be behind a proxy but I’m not sure why this would cause you a problem. Are you absolutely sure that the API key is correct? As for the Factory Client error that may be a red herring – I see those in my logcat output too. Have you tried installing the application on a real device [I’ve another post here about that]? This will tell you if it’s the firewall/proxy causing your problems.
i have generated it 3 times the google gives me the the same api key…maybe bcoz i use the same debug.keystore..nope i haven’t tried installing the app on real device…actually i do not have real device to work on…can u give the link to your post about installing map app on real device….if u want to look into the matter why doesn’t it work behind proxy refer
http://code.google.com/p/android/issues/detail?id=3764#makechanges. dis link shows why standard built-in map app doesn’t work behind proxy .this may give u some idea about the problem…..
the standard built-in map app doesn’t work in mine too…
please let me know …if u find a way out of this ..
thanks …
The post I mentioned can be found at https://onthefencedevelopment.com/2010/11/25/android-development-moving-emulator-device. This details how to generate an installable .apk file. You can of course use Eclipse to install and debug the app on the device directly – I don’t have a blog post on that at the moment but can provide some basic info if you need it (won’t be until tomorrow at the earliest though as I don’t have my dev laptop with me at the moment)
it would be great..if you can provide me some info/details about the making the map app work….behind a corporate firewall/proxy…..thanks …..
Not being behind a proxy it may be a bit hard for me to replicate this but I’ll have a look around to see if I can find anything useful.
Ok, a quick Google and I found a few people mentioning that they needed to start the emulator with a -http-proxy switch to get things working behind a proxy. A quick search on the Android Developers site and I found this page (http://developer.android.com/guide/developing/tools/emulator.html) which details the command line switches for the emulator. Towards the bottom of the page, in the Network category, the definition for –http-proxy says
> Make all TCP connections through a specified HTTP/HTTPS proxy
Give that a whirl and let me know if it sorts your problem.
hi this has been my best explained tutorial thanx very much keep it up
Very good! Easy to understand even for a total beginner as me! :-) Thank you!
Great post! But when I downloaded and executed the code, everything except the map is getting displayed. Zoom in/out is also working fine. I can just see a screen with square boxes. No United States map. Am I missing something?
Sounds like you’ve not generated and/or applied a Google Maps API key. This is particular to each installation so I can’t include mine because it simply won’t work for you.Refer to the start of this post for details on how to get you API Key for Google Maps.
I’m new to android. When I create the android project, for built target I do not have the options to select Google API version but just the normal API version in the list. Only in the compile with field has the options for both Google API and normal API version. I’m not able to run the output in the emulator and shows error as INSTALL_FAILED_MISSING_SHARED_LIBRARY. I’m currently using android 4.2 Jelly Bean. Would be glad if someone can help me figure out my problem.
Sounds like you have not installed the Google SDKs – take a look here: http://developer.android.com/sdk/installing/adding-packages.html. Post back if you have no luck and I’ll take a look when I’m in front of my development. system.
Even I’m facing the same problem, the map does not display but only grey boxes. I have generated twice the Api key from Google API console but still it doesn’t work. Need help!
Reading into this it looks like a V2 API key will not work in a V1 application – which is a bit of a pain. Looks like I’ll have to put a refreshed tutorial together but I’m afraid that will take a few weeks to do.