Using Google Maps in your Android Applications – Part 3 [Adding Place Markers]
android development java google-maps This tutorial was created using the Google Maps API v1 and as it is not possible to obtain a v1 key anymore this series of posts is pretty much obsolete. I’ve been looking at creating an updated set of tutorials and I’ll post them as soon as they are ready.
If you have been following along with Part 1 and Part 2 of this mini-series you should now have a basic Android application which displays your current location on a map. Not amazing functionality I’ll admit but the basis for many location based applications in the Android Market. What will make the application truly useful is the ability to add markers at specific locations, e.g. points of interest, cash machines, checkpoints etc. While this installment is about how to display the markers at the appropriate map locations it will not cover how that location data is obtained. In some cases it may be possible, although unlikely, to hard code the locations into the application itself. Alternatively the data may be provided via a webservice of some description and that data may or may not be persisted in the built-in SQLite database (as it is in my application). For the purpose of this exercise we’ll be hard coding the data in the application.
When I started my application this was the part I found the most frustrating, mainly because there was so little information out there and what there was seemed over complicated, poorly presented and (as it turned out) not very efficient for my requirements, i.e. the map took far too long to render. The reason for this was that most of the blog posts were advising that using ItemizedOverlay was the way to go. I duly followed along and had my application working – but it was too slow to be usable. Adding some debug output I could see that it was taking about half a second to plot each point and I had over 600 of these so I’m sure you can do the maths on this and see my problem.
Now it could well be that I had an issue with my code (although I had followed the process described in numerous blog posts) and before everyone starts adding comments that I must have been calling populate() too often I can assure you i was not. I have subsequently read that ItemizedOverlay is only really suitable for ‘a dozen or so’ items and that performance degrades significantly as the number of items increases – that was certainly my experience.
The solution I’ve adopted is to create an overlay class which extends Overlay instead of ItemizedOverlay and as ItemizedOverlay itself also extends Overlay all I’m doing here is cutting out the middleman. As we start to add code to this class it will be necessary to import a number of namespaces and for the sake of brevity I will assume that you are comfortable with doing this. If not then don’t panic, the final class code will be provided within the article and of course within the project download for this installment.
With the preamble out of the way, lets get coding. If you have been following along then you can use the project you have created by following along with this mini-series, or you can download the project from here.
With the project open in Eclipse
- Right-click on the main package file (within the src folder and in my case called com.onthefencedevelopment.androidmaps101)
- Click New followed byClass in the resulting menus.
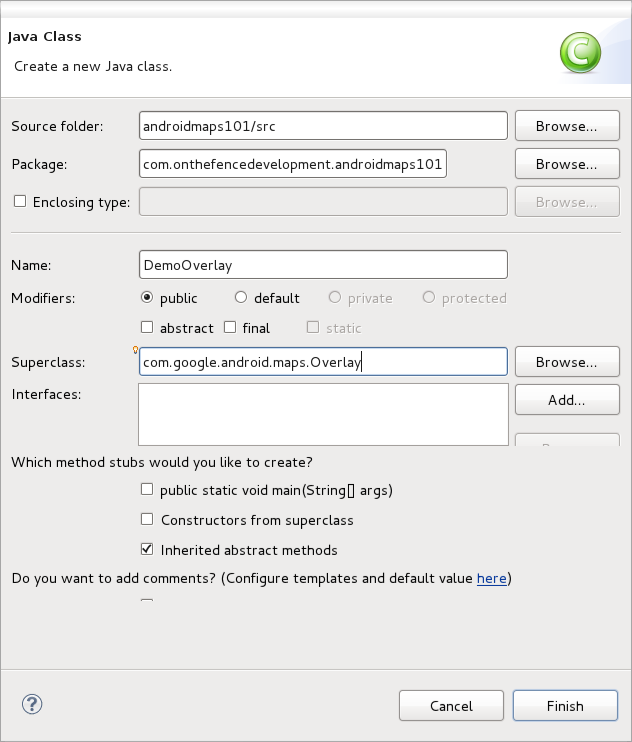
In the resulting ‘Java Class’ dialog specify a suitable name for the new class, I’ve used DemoOverlay, and replace the default Superclass value with com.google.android.maps.Overlay.
Eclipse will now create a template class ready for our code. Position the cursor between the curly braces and press CTRL+SPACE. This will bring up a list of all of the methods of the Overlay class that can be overridden. Scroll down to the draw method which takes three parameters (context, mapview and shadow) and press enter – Eclipse will now create a method stub with the appropriate signature.
Your Overlay class should now look like this:
package com.onthefencedevelopment.androidmaps101;
import android.graphics.Canvas;
import com.google.android.maps.MapView;
import com.google.android.maps.Overlay;

public class DemoOverlay extends Overlay {
    @Override
    public void draw(Canvas canvas, MapView mapView, boolean shadow) {
        // TODO Auto-generated method stub
        super.draw(canvas, mapView, shadow);
    }
}
Our code is going to start after the call to the superclass and the first thing we are going to do is to obtain a reference to the MapViews Projection object. The Projection object translates between on-screen pixels and latitude/longitude pairs and is obtained with a single line of code:
Projection projection = mapView.getProjection();
Next we need to determine the latitude/longitude range of our screen, i.e. where in the world we are looking and how much of it we can see.
int latSpan = mapView.getLatitudeSpan();
int lngSpan = mapView.getLongitudeSpan();
GeoPoint mapCenter = mapView.getMapCenter();
int mapLeftGeo = mapCenter.getLongitudeE6() - (lngSpan / 2);
int mapRightGeo = mapCenter.getLongitudeE6() + (lngSpan / 2);
int mapTopGeo = mapCenter.getLatitudeE6() - (latSpan / 2);
int mapBottomGeo = mapCenter.getLatitudeE6() + (latSpan / 2);
The first three lines call on the MapView methods to obtain the central latitude/longitude and the screen width and height in terms of longitude and latitude respectively. The next four lines calculate the coordinates of the edges of the screen in relation to the map.
The reason we have done this is so that we can determine whether or not to add a particular marker to the overlay or not – there is no point adding it if it will never be seen and it will only waste resources if we do.
As already mentioned, I’m not going to cover how the location data is obtained, stored or retrieved so I’m going to hard code it for the sake of this exercise. So, add the following method which will return a single GeoPoint for an as yet unknown location 😉
private GeoPoint getSampleLocation() {
    // Create GeoPoint to secret location....
    GeoPoint sampleGeoPoint =
        new GeoPoint((int)(56.27058500725475 * 1E6),
            (int)(-2.6984095573425293 * 1E6));
    return sampleGeoPoint;
}
Now we can declare and instantiate a GeoPoint variable by calling the method from within our draw method. Add this just after the calculations for the screen boundaries.
GeoPoint geoPoint = this.getSampleLocation();
Now that we have our GeoPoint we need to determine if it is visible within the part of the map displayed on the screen. This is a simple matter of comparing it with the values we calculated earlier:
if ((geoPoint.getLatitudeE6() > mapTopGeo && geoPoint.getLatitudeE6() < mapBottomGeo)
        && (geoPoint.getLongitudeE6() > mapLeftGeo && geoPoint.getLongitudeE6() < mapRightGeo)) {

    Point myPoint = new Point();
    projection.toPixels(geoPoint, myPoint);
    Bitmap marker = BitmapFactory.decodeResource(mapView.getContext().getResources(), R.drawable.markerblue);
    canvas.drawBitmap(stationMarker, myPoint.x - 15, myPoint.y - 30, null);

}
At this point Eclipse will complain about the R.drawable.markerblue argument we used when declaring and instantiating the marker bitmap. This is because it does not exist in the project yet. You can download it from here and save it to a folder called drawable within the res folder of the project (if the drawable folder is not present in the folder structure then just create it). You may have to refresh the project afterward by right clicking on it in the Package Explorer and clicking Refresh.
The completed overlay code should look like this:
package com.onthefencedevelopment.androidmaps101;
import android.graphics.Bitmap;
import android.graphics.BitmapFactory;
import android.graphics.Canvas;
import android.graphics.Point;

import com.google.android.maps.GeoPoint;
import com.google.android.maps.MapView;
import com.google.android.maps.Overlay;
import com.google.android.maps.Projection;

public class DemoOverlay extends Overlay {

    @Override
    public void draw(Canvas canvas, MapView mapView, boolean shadow) {
        super.draw(canvas, mapView, shadow);

        Projection projection = mapView.getProjection();

        int latSpan = mapView.getLatitudeSpan();
        int lngSpan = mapView.getLongitudeSpan();
        GeoPoint mapCenter = mapView.getMapCenter();
        int mapLeftGeo = mapCenter.getLongitudeE6() - (lngSpan / 2);
        int mapRightGeo = mapCenter.getLongitudeE6() + (lngSpan / 2);

        int mapTopGeo = mapCenter.getLatitudeE6() - (latSpan / 2);
        int mapBottomGeo = mapCenter.getLatitudeE6() + (latSpan / 2);

        GeoPoint geoPoint = this.getSampleLocation();

        if ((geoPoint.getLatitudeE6() > mapTopGeo && geoPoint.getLatitudeE6() < mapBottomGeo)
         && (geoPoint.getLongitudeE6() > mapLeftGeo && geoPoint.getLongitudeE6() < mapRightGeo)) {

            Point myPoint = new Point();
            projection.toPixels(geoPoint, myPoint);

            Bitmap marker = BitmapFactory.decodeResource(mapView.getContext().getResources(), R.drawable.markerblue);

            canvas.drawBitmap(marker, myPoint.x - 15, myPoint.y - 30, null);
        }
    }

    private GeoPoint getSampleLocation() {

        // Create GeoPoint to secret location....
        GeoPoint sampleGeoPoint = new GeoPoint((int) (56.27058500725475 * 1E6), (int) (-2.6984095573425293 * 1E6));

        return sampleGeoPoint;
    }
}
We are done with this class now so close it and open the OpenMap.java file we created in part 1 and enhanced in part 2. Within the onCreate method add the following two lines at the end.
DemoOverlay demoOverlay = new DemoOverlay();
mapView.getOverlays().add(demoOverlay);
These simply create a new instance of the overlay and add it to the MapView overlays collection.
We can now run the application and see where in the world we have placed the marker.
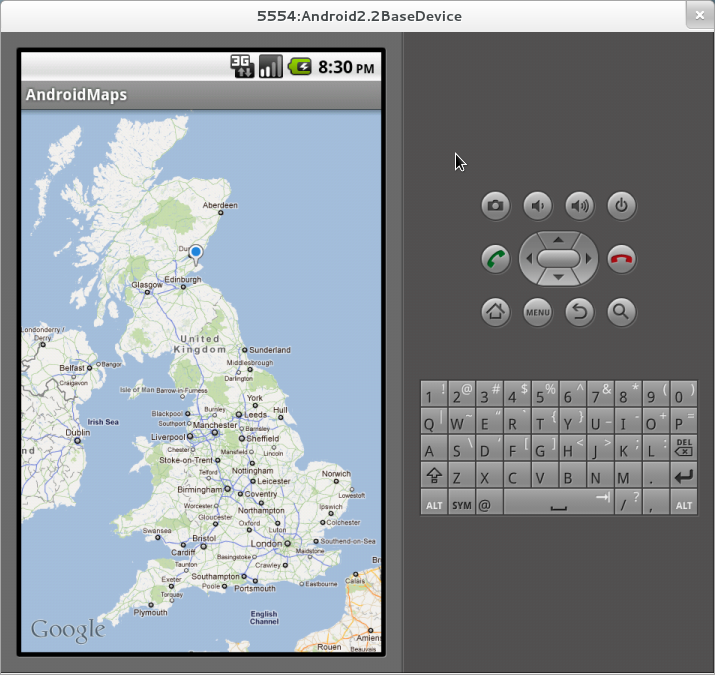
If you pan and zoom into the marker location you will see that it is located in the East of Scotland at what appears to be quite an uninteresting location – but it is actually Scotlands Secret Bunker, which is of course not much of a secret anymore 😉
So what have we done here? Well, in just over 50 lines of code we’ve created an overlay class which will add a marker to a map surface using latitude/longitude coordinates. Ok the class is a bit contrived with a hard coded location but it can easily be extended to create markers for a collection of locations, bearing in mind that only those that fall within the viewable area of the map will be rendered.
Click here for the working project for this instalment, remember you’ll need to add your Google Maps API key.
If you have any problems with the project or notice something wrong with the code or the blog post then please leave a comment to let me know.
Where to next? Well, having locations on a map is one thing, but dropping a marker on a map is only part of the story – what we need to do next is allow a user to tap on a location and have additional information about it displayed on screen. That will be the subject of part 4 of this min-series and will probably hit the blog in the New Year.
Comments
Comments are now closed17 responses
Excellent series of tutorials. So much more helpful than anything I have found so far. I’m hoping you get around to putting together Part 4 in this series sometime soon! Thanks for your efforts.
Thanks for the feedback Brad – glad you are finding the series useful. I’m currently working on part 4 at the moment and I hope to publish it within the next week or so.
Thanks Dave. Great tutorials. Best tutorials on maps I have found yet on the internet.You made it very simple and easy to understand. Waiting eagerly for next part.
Thanks for your great post! What I still don’t understand is why you’re using the Projection class. Why you wrote something like this:
myPoint.x – 15, myPoint.y – 30? What is it exactly for? Thank you.The projection class is required to convert the maps latitude/longitude coordinates to x/y coordinates for the screen.The
myPointadjustments were made to position the tip of the marker at the correct location, rather than just using the center point of the image.Thanks so much..ladyanne
Part 4 is underway and I hope to get it published over the weekend – glad you have found it helpful.
Thanks buddy. You saved me a day. Finally I got an easy solution to check if a point is within the screen boundary or not. Thanks again.
Glad you found the post helpful
Thanks a lot for this series of tutorials !! It’s just that I’m needing!
Hi Diego, Thanks for taking the time to post your feedback – I’m glad you are finding the tutorials useful.
How can one add pin/markers dynamically when tapping the screen, source code?
Off the top of my head I’m not sure, sorry. Can look into it when I get time but you maybe able to pull something together using the code in this project. You’ll need to capture the tap location and pass this to a MapOverlay to add the marker.
Aww this tutorial was supercool! Good job!!!!!
thank you very much for making this useful and neat tutorial.
can you plz tell me how to make the google maps application to run on a real deviceit works fine in my emulator but not in a real device
only problem with application is it doesn’t load maps that’s it i am just geeting a grid view
Sounds like maybe a problem with your Google Maps API Key – how have you signed your package? If you are not using the debug keys to sign your app then you’ll need to generate a new GMaps API Key to use with the deployment.