Using Google Maps in your Android Applications – Part 2 [Showing Current Location]
android development java google-maps This tutorial was created using the Google Maps API v1 and as it is not possible to obtain a v1 key anymore this series of posts is pretty much obsolete. I’ve been looking at creating an updated set of tutorials and I’ll post them as soon as they are ready.
In my last post I showed you how to create a basic Android application which would display a map and zoom in to a specific location, my home town. While the functionality was not what you could call awe-inspiring it does lay the foundations for most mapping applications and serves as a good starting point. You can download the code from Part 1 but you will need to insert your own Google Maps API key for it to display the maps.
In this installment I had intended to continue from where we left off last time and add the functionality required to display markers/pins on the map to indicate points of interest. There are however a couple of areas to cover and I didn’t want to end up writing a massive post to cover both – so I’m going to split this functionality into two parts; showing the current location and showing locations of points of interest. To display the current location we are going to use the built-in ‘MyLocationOverlay’ component which (as the name suggests) displays your current location on the map and centers the view around it. The overlay itself only requires a handful of lines of code but there are a few things that you need to be aware of which we’ll cover later.
I’ll assume that you have the sample code from Part 1 (either you followed along last time or have just downloaded and imported it into Eclipse) and have your Google Maps API key inserted into the main view.
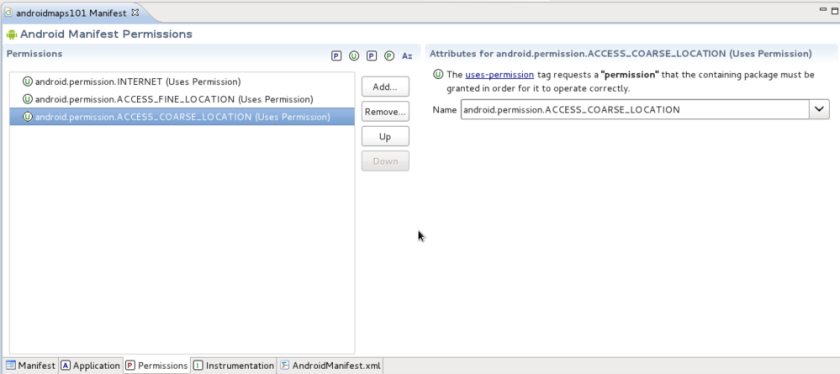
The first thing we are going to need to do is to request permission to access the Location sensors within the device. To do this we need to open the AndroidManifest.xml file as we did in Part 1 and click on the Permissions tab where you should see the INTERNET permission we added last time.
- Click on the ‘Add’ button and using the dropdown list select the
android.permission.ACCESS_FINE_LOCATIONpermission. - Repeat the process to add
android.permission.ACCESS_COARSE_LOCATION.
The difference between FINE and COURSE location is basically using either GPS or your Mobile Network Signal to determine your location. Your screen should now look something like this (note that while there are Move Up/Down buttons, for our purposes the order of these permissions is not important – or at least they do not seem to be).
Save and close the manifest – we’re done with that for now.
If it is not already open, locate the OpenMap.java file in the Package Explorer and double-click it to open it. The first thing we need to so is to remove the line of code that centers the map on Exmouth so locate the following line and remove it:
// Centre on Exmouth
mapController.setCenter(new GeoPoint((int) (50.634955 * 1E6),
                                     (int) (-3.409753 * 1E6)));
Next, after the declaration of the MapController we need to declare the MyLocationOverlay
private MapController mapController;
private MyLocationOverlay myLocation;  // Add this line
Eclipse will now display a red squiggle under MyLocationOverlay of the new line, this is because we have not told it where to find this type. By far the easiest way of rectifying this is to hover over the highlighted ‘word’ and wait for Eclipse to tell us what is wrong and, more importantly, how we can fix it. In this instance click on the ‘Import MyLocationOverlay’ option. A new line will be added under the existing imports and the squiggle will disappear.
Now we can update our onCreate method to create an instance of the overlay by adding the following code after the call to mapController.setBuiltInZoomControls:
// Add the MyLocationOverlay
myLocation = new MyLocationOverlay(this, mapView);
mapView.getOverlays().add(myLocation);
myLocation.enableMyLocation();
The first line instantiates the overlay, the second one adds it to the collection of overlays in the current MapView object and the last one tells it to start polling for location updates.
Many of the examples I read stated that this was all that was required to get the MyLocationOverlay working but nothing seemed to happen for me, running the application in the emulator gave me a map centered on Tulsa but refused to move even when I sent a location update to the emulator (more on that in a minute). After a lot of digging around I found that by adding the following snippet of code everything came together and started working.
myLocation.runOnFirstFix(new Runnable() {
    public void run() {
        mapController.animateTo(myLocation.getMyLocation());
    }
});
Basically this creates a thread which will run when the system has a location fix (it will run immediately if a fix has already been established). The code within the method simply tells the MapController to move to the specified location in much the same way as we centered on Exmouth but this time using dynamic values from the MyLocationOverlay.
Your onCreate method should now look like this:
/** Called when the activity is first created. */
@Override
public void onCreate(Bundle savedInstanceState) {
    super.onCreate(savedInstanceState);
    setContentView(R.layout.main);

    // Get Mapping Controllers etc
    MapView mapView = (MapView) findViewById(R.id.map_view);
    mapController = mapView.getController();
    mapController.setZoom(11);
    mapView.setBuiltInZoomControls(true);

    // Add the MyLocationOverlay
    myLocation = new MyLocationOverlay(this, mapView);
    mapView.getOverlays().add(myLocation);
    myLocation.enableMyLocation();

    myLocation.runOnFirstFix(new Runnable() {
       public void run() {
           mapController.animateTo(myLocation.getMyLocation());
       }
    });
}
Ok, so we have a runnable application which should display the current location – but how do we test this without installing it on a location enabled device, i.e. how do we run it in the emulator and simulate location updates?
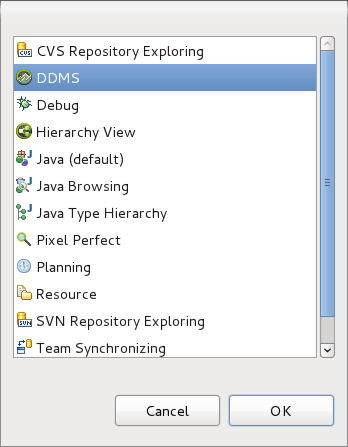
First we need to open a new perspective in Eclipse (a perspective is basically a preset arrangement of windows aimed at a particular purpose, e.g. Debug). From the Window menu select Open Perspective followed by Other from the resulting sub-menu. Select DDMS from the resulting dialog:
DDMS is the Dalvik Debug Monitor Server which is how we can not only see what is going on in the emulator but also interact with it. We will be using it to send location updates but the DDMS allows us to place fake calls and send fake SMS as well as providing access to the debug trace logs in real time.
Now we can start our application in the emulator and using the buttons in the top right corner of the code window we can open the DDMS perspective which should look something like this.
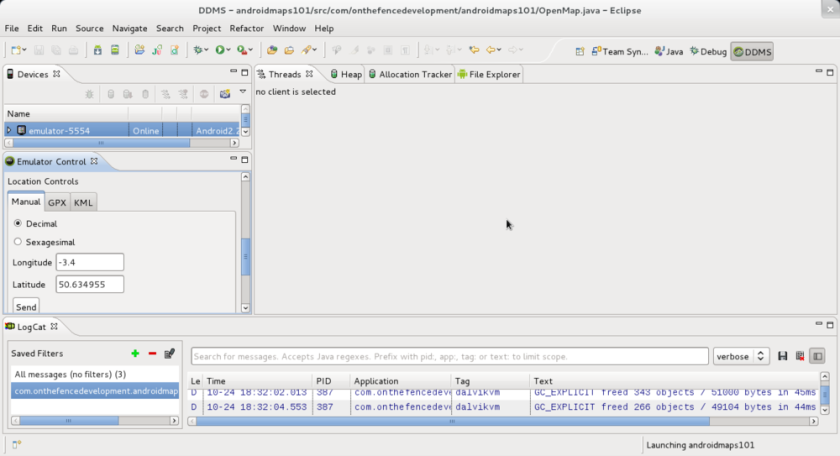
It looks a bit cluttered but I’m running a 15.6″laptop so your view may look less so and you can close/hide windows and move them around as you see for. Also note that I’ve scrolled the Emulator Control window down a bit to show the area we are interested in, the Location Controls.
In the Devices window you should see the running instance of the emulator(s) (or any connected Android devices in USB mode). If it is not already selected then do so now to tell the DDMS that we intend to interact with it.
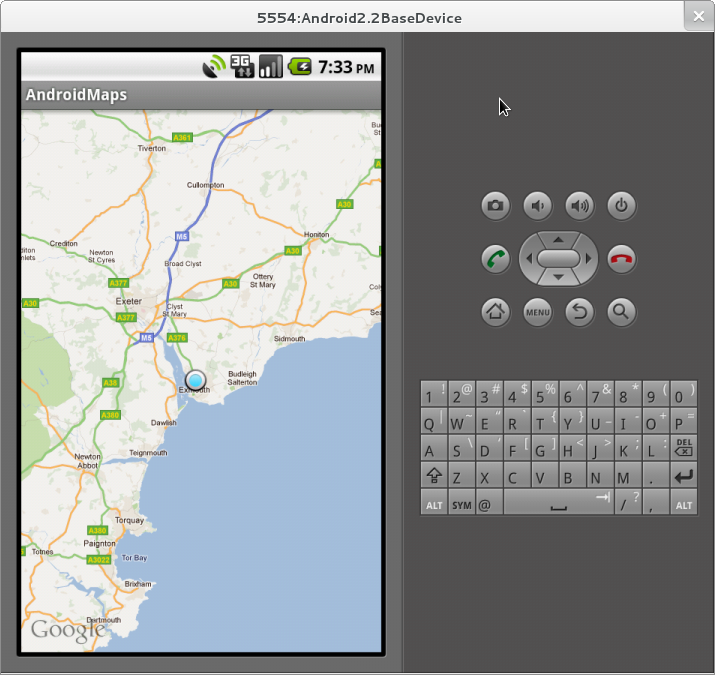
In the Location Control window, enter a valid Latitude/Longitude pair and, with the Emulator in view if possible, press Send. Hopefully (unless you entered the coordinates for Tulsa) you will see the map move to display the location at the specified coordinates. [No prizes for guessing where those in the screenshot resolve to].
So that’s it we’re done, yes. Well, again, not quite. While this will work fine in the emulator in the real world and on real devices there is something we have not accounted for; What happens to our application when it’s running in the background, i.e. when the user has returned to the Home screen or opened another application? If you were to run this application on a real device with GPS enabled you would see that when you returned to the Home screen the GPS icon would still be displayed in the notification area. We have hooked ourselves onto the location sensors and if we leave them in this state we could degrade the performance of the device and even become a battery hog – users don’t like this one bit!
Fortunately the solution is pretty simple and with the addition of two override methods and a couple of lines of code we can be device friendly.
Add the following two methods to the OpenMap class, anywhere will do but I’ve put mine between the OnCreate and isRouteDisplayed methods;
@Override
protected void onResume() {
    super.onResume();
    myLocation.enableMyLocation();
}

@Override
protected void onPause() {
    super.onPause();
    myLocation.disableMyLocation();
}
OnPause and OnResume are called when the application is moved to the background and foreground respectively so here we are turning the location updates off and back on again as the application moves between these states.
I’ve installed this version of the application on my old HTC Hero and tested it in the car and everything worked as expected, the map even re-centered when the location marker reached the edge.
So there we are, with a few more lines of code we have a location aware map application which we will build on in Part 3 of this Mini-Series when we add a custom overlay which we can use to display our points of interest.
If you’ve had any problems following along (or if I’ve missed something when writing this up) then I’ve uploaded the Eclipse project for you to download here. Remember that you will need to add your Google Maps API key to the main.xml file (see Part 1 for more details).
Please feel free to leave a comment if you think I could improve this post – I’m not so proud that I can’t take it
Comments
Comments are now closed10 responses
I need some help I want to show user current location which is working for me but when user moves current location must keep moving or updating on map in smooth manner i.e. not like blinking marker (Jumping marker from one location to another). I am looking at many places but nothing showed this way. Please check if you could…
Thank You
When I was testing this code I did try it out while I was driving and the blue dot did follow my location – the map re-centred when the dot reached the edge of the display. With the other location listeners it is possible to set the update rate but I’m not sure if this is the case with the MyLocation overlay – i think it just does it but I could be wrong.
Let me know how you get on and I’ll see if I can install this version of the project onto my phone at some point and see if it does what I think it does 😉
Excellent so far and am looking forward to the rest of this tutorial, especially how to click a location and add an overlay marker there; and possibly double-clicking to remove it?
Help me. I followed your tutorial from part 1 and everything worked well.I try your second tutorial and the map doesnt display. It just display blinking marker and blank page (white). I download your project and then change apikey, the result is blinking marker and blank page (white) too.
I build project in Google APIs 4.1 (16). Really need your help. Thanks a lot
Hi Tika, That’s really odd – I’ve just downloaded the project, added my maps key and the maps are being displayed. If they are not displaying for you then I suspect a configuration issue at your end.
Things to check are: do you have an internet connection, have you changed the keystore (you’ll know if you changed it) that you are building against, have you pasted the maps key in correctly?
Try regenerating a key as detailed in part 1 – is it the same as before?
Let me know how you get on – I’ll do what I can to help.
I have internet connection, never changed keystore, and pasted the maps key correctly.Finaly I uninstalled android sdk and reinstalled again. I use ADT Bundle for windows. Create new android project and generate MD5 fingerprint, generate api key. And the result is same.it just display blinking marker. map is not displayed. It is so frustating. Is it because of Google Maps Android v1 API (Deprecated)? Should I use google maps android v2 api?
Ok, are you sure that you have generated your maps key correctly [https://developers.google.com/maps/documentation/android/v1/mapkey?hl=sv-SE#getdebugfingerprint].
While v1 of the API has been deprecated, i.e. it is not possible to obtain a new key for that level, it should still work. That said, you should probably consider getting a v2 key so that you have the latest features.
Awesome tutorial it helped me a lot can you help me in how to get data of nearest restaurants upon map view
Thanks
Aditya
hi! thank you very much! But when i send lattitude/langitude it doesnt moving, just staiyng on Tulsa. how do think what the matter?
I had this problem too and if you refer back to the article you’ll find that the solution is through the use of myLocation.runOnFirstFix within the OnCreate method.