
Installing Eclipse and the Android SDK on Ubuntu 10.04/10.10
linux ubuntu android eclipse As previously posted I have recently bought myself a nice new Android phone – a HTC Hero to be precise. One of the main reasons for buying it was so that I could look into developing applications for this new platform, thus expanding my skill set.
I had been playing around with installing the Eclipse IDE (arguably the best Java IDE around) and the Android SDK on my previous Ubuntu installation and basically made a hash of it a few times. Having refined my process I’ve decided to write it down so that I don’t forget ;-) Following my clean installation of Ubuntu 10.10 I needed to get my development environment sorted out, and this meant installing Eclipse and the Android SDK and then wiring them both together.
When downloading the IDE I opted for the ‘Eclipse IDE for Java Developers’ because essentially Android is a set of libraries built on top of Java, so it seemed like a good place to start. Note that I’m using Eclipse 3.6 (Helios) for my development.
Thanks to Kalpak (see comments) for noticing that I had not detailed the installation of a Java SDK. I must have already had on installed on my system when I decided to write this post. I’ve updated this post with the required installation.
In Kalpaks comment he mentions that Java 1.6 is not supported for Android development but this no longer seems to be the case – although I stand to be corrected 😉
First we need to install a Java SDK – apparently 1.5 or 1.6 will suffice but I’m going to install 1.6 here by running:
sudo apt-get install sun-java6-jdk
With that complete we are ready to install Eclipse.
The installation process for Eclipse is a simply case of extracting the downloaded archive into a suitable location, I’ve created a folder called Applications in my /home/dave directory and extracted the archive into it. Double clicking on the eclipse executable file kicked off the IDE which loaded quite quickly after prompting my for a workspace location – I just kept the default.
So that’s Eclipse sorted, now what about the Android SDK?
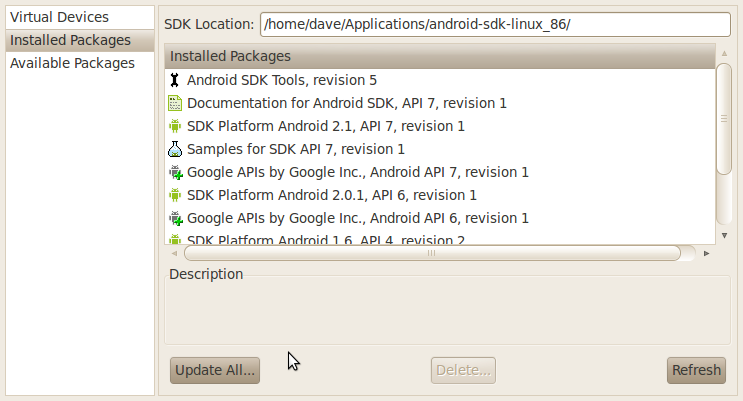
After downloading the SDK it too is installed by simply extracting into a suitable location, again I extracted it into my /home/dave/Applications folder. But we are not quite finished yet – we need to use the SDK Manager to download and install at least one Android development platform first (read the ‘SDK Readme.txt in the folder when you extracted the SDK for more details). This is a simple case of executing [SDK Folder]/tools/android (either via the command line for by double-clicking it).
The SDK and AVD Manager will now load and I simply selected the ‘Available Packages’ option, selected everything in the right-hand pane and clicked on ‘Install Selected’. After a length installation process I was done – this is my SDK/AVD Manager after the installation completed.
So that’s it, we’re there yes? Well no, not yet. In the Windows world we are used to installations detecting the presence of IDEs or vice-versa and everything just working once the installer finishes. Well Linux is not like that we need to so some additional configuration before we can get coding; in fact Eclipse/Android installation is pretty much the same on all platforms, so it’s not just an Linux thing.
The first thing to do is to install the Android ADT (Android Developer Tool) plugin into Eclipse – which you’ll be happy to hear is a semi-automatic process.
- Start Eclipse and select ‘Install New Software’ from the Help menu.
- Click the ‘Add’ button next to the “Work With” dropdown list.
- Enter a suitable name for this resource, e.g. Android Developer Tools, and the following URL into the location: https://dl-ssl.google.com/android/eclipse
- Click Ok
Eclipse will now search for the ADT plugin and all things being equal will display a screen similar to this:
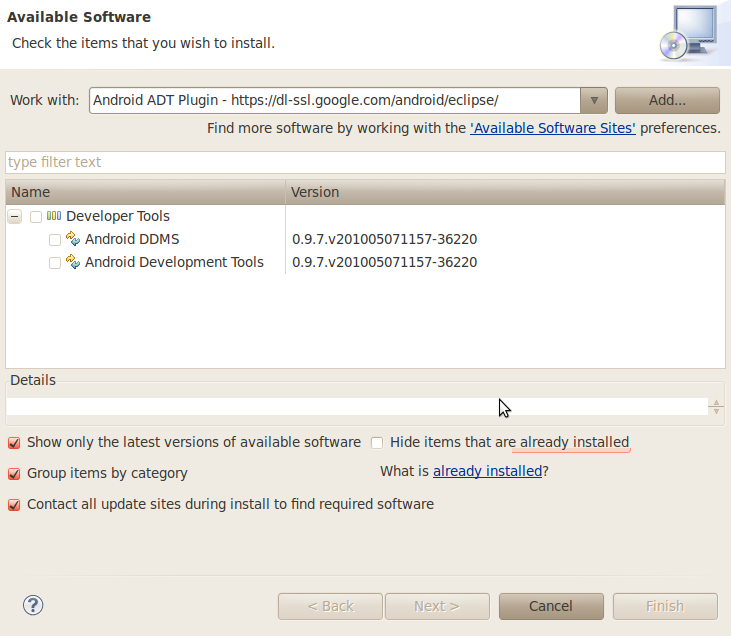
Select the ‘Developer Tools’ checkbox (which will select the DDMS and Development Tools beneath it) and click next. After agreeing to the Licence Agreement (which of course you read first) click Finish and the installation will proceed.
You may get a security warning at this point because the packages are apparently unsigned but I just clicked OK to carry on. All things being equal you will be prompted to restart Eclipse.
Finally you need to tell Eclipse where the Android SDK has been saved. To do this simply select Preferences from the Window menu, click on the Android option in the left hand pane and then the Browse button next to the SDK Location field. Navigate to the folder where you extracted the SDK and click OK. Click OK in the Preferences window and you are done.
Selecting File > New you will see ‘Android Project’ displayed and clicking it will display the following window:
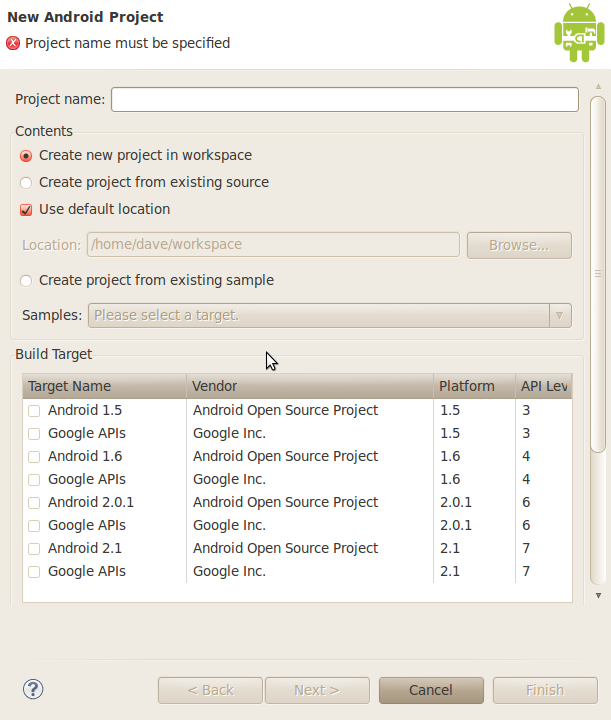
There seems to have been a change here, I don’t see the ‘Android Project’ option when I click File > New anymore. Now I have to click File > New > Project, expand the Android option on the resulting window and there is the Android Project option. Not sure if this is a change or because I’ve now done something differently·
Now I’m still new to Android development so I’ll not inflict my poor knowledge of what you need to enter into this screen – you probably know better than me at the moment anyway 😉
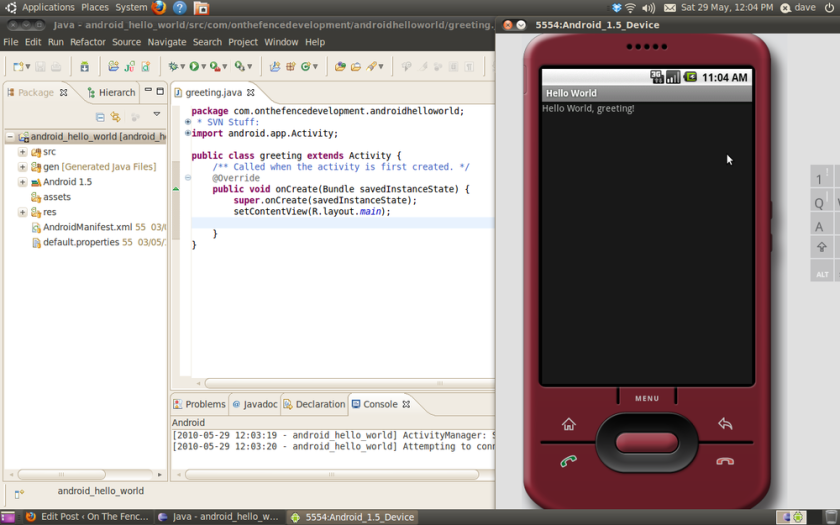
What I can say is that I managed to complete the obligatory ‘Hello World’ application from my copy of ‘Professional Android 2 Application Development’ book by Reto Meier so I must have it set up somewhere near right.
Comments
Comments are now closed38 responses
Thanks for this nice posting.I had the same problem and was not able to install Eclipse on Linux. Now I got tutorial step by step on how to install Eclipse on linux. Just thougth to share who is very new to linux as me.
http://ayushsuman.blogspot.com/2010/06/how-to-install-eclipse-on-linux-eclipse.html
Thanks,
Binod Suman
Thanks for sharing your post – I think I already had Java installed so didn’t include it in the above post. Your post fills that gap
Hi, everything seems to be working fine except when I invoke android from the command line (instead of via Eclipse). I get the following error:
$ android
Starting Android SDK and AVD Manager
No command line parameters provided, launching UI.
See ‘android –help’ for operations from the command line.
Exception in thread “main” java.lang.UnsatisfiedLinkError: no swt-gtk-3550 or swt-gtk in swt.library.path, java.library.path or the jar file
at org.eclipse.swt.internal.Library.loadLibrary(Unknown Source)
at org.eclipse.swt.internal.Library.loadLibrary(Unknown Source)
at org.eclipse.swt.internal.C.(Unknown Source)
at org.eclipse.swt.internal.Converter.wcsToMbcs(Unknown Source)
at org.eclipse.swt.internal.Converter.wcsToMbcs(Unknown Source)
at org.eclipse.swt.widgets.Display.(Unknown Source)
at com.android.sdkmanager.Main.showMainWindow(Main.java:265)
at com.android.sdkmanager.Main.doAction(Main.java:249)
at com.android.sdkmanager.Main.run(Main.java:94)
at com.android.sdkmanager.Main.main(Main.java:83)
Does anyone have any thoughts?
Cannot complete the install because one or more required items could not be found.Software being installed: Android Development Tools 0.9.7.v201005071157-36220 (com.android.ide.eclipse.adt.feature.group 0.9.7.v201005071157-36220)
Missing requirement: Android Development Tools 0.9.7.v201005071157-36220 (com.android.ide.eclipse.adt.feature.group 0.9.7.v201005071157-36220) requires ‘org.eclipse.gef 0.0.0′ but it could not be found
I think I’ve got similar issue and it seems that you have installed just pure Eclipse from ubuntu repository, so you have to install some other plugin from the repository, I think somethink like “eclipse jdk”.
Hope it helps.
Hello,
A simple addition : This whole process requires you to have Java5 SDK installed. So, for that you need to edit your sources.list file. Open up the terminal and type in “sudo nano /etc/apt/sources.list” . And at the end of the file, add this “deb http://us.archive.ubuntu.com/ubuntu/ jaunty main multiverse universe restricted” . And then save it and close the text editor. Now in the terminal, type > sudo apt-get update. After that >sudo apt-get install sun-jva5-jdk.
Hope this helps! ! Cheers to Dave! !
Regard,
Kalpak Khemka.
Thanks for the information Kalpak – however I think I have the OpenJDK v6 installed – I’ll have a look and make sure, good to know all the options.
I certainly don’t recall updating my sources.list file – but I may be having a senior moment at this end
[Update: Yep, only the OpenJDK v6 installed here and it looks like I did it from the Ubuntu Software Centre not via apt-get, so no update required in sources.list. Note that I have not really developed anything in Android in anger yet so I might find that the OpenJDK is not up to the task]
Hello again,
Well, according to the Android Source Website, Java6-SDK is not supported for development since it does not support one of the options or something.
So, Java5-SDK is required/recommended by them!
Regards,
Kalpak Khemka.
Hi Kalpak,
Thanks for the ongoing feedback – much appreciated
I’ll be paving my main laptop next week for Ubuntu 10.10 so will probably review this post – making sure I keep a note of exactly what version of the Java SDK I end up installing.
Cheers
Dave
Hi Kenny,
It is indeed ‘sudo’ that you need to be using, this temporarily increases your permissions to allow the installation of software – and other things.
Hope you get on ok with the rest of the post but post back if you have any problems.
this is what i got? i am very new to java, ubuntu, and eclipse, but my command line doesnt seem to work for anything. and the books i ordered havent gotten here. so any help would be great. mackowski@ubuntu:~$ sudu apt-get install sun-java6-jdk
No command ‘sudu’ found, did you mean:
Command ‘sudo’ from package ‘sudo’ (main)
Command ‘sudo’ from package ‘sudo-ldap’ (universe)
Command ‘tudu’ from package ‘tudu’ (universe)
sudu: command not found
mackowski@ubuntu:~$ apt-get install sun-java-jdk
E: Could not open lock file /var/lib/dpkg/lock – open (13: Permission denied)
E: Unable to lock the administration directory (/var/lib/dpkg/), are you root?
mackowski@ubuntu:~$
Thanks for this post. I followed your instructions and was able to install Eclipse and Android easily. Appreciate the effort you took to make it easy.
I found that using
sudo apt-get install sun-java6-jdk
would not install java for me, following these steps allowed it to install no problem
sudo add-apt-repository ppa:sun-java-community-team/sun-java6
sudo apt-get update
sudo apt-get install sun-java6-bin
Heya Dave,
thanks for this i just finished setting everything up. Got Java installed, eclipse and Android.
now its time to build my 1st app on Android, yeah!!!
i got myself an LG Optimus one P500 and this thing is awesome i’m really happy with Android framework works well.
thanks cheers.
Thanks allot for such a useful information.
I assume you are referring to Kalpak’s comment and it sounds like you have missed the ‘sudo’ from the start of the command : sudo nano /etc/apt/sources.list. Give that a try and let me know how you get on.
Hey Dave,
Its really nice to see that my post is helpful. I’m glad i could be of any help. I’m humbled!
Regards.
Thanks for the guide!
Note, you can also install Eclipse directly from your preferred app installer, e.g
sudo apt-get install eclipse-platformcheers,
DT
That’s true enough but they are normally a version behind – I’m using 3.6 but I think that the repo currently ‘only’ has 3.5 (although I could be wrong). Running the latest version is not essential (and sometimes problematic) but it’s good to have the choice
The AVD can take quite a while to start up – my old laptop took over 5 mins sometimes, even my new one takes over a minute to get to the unlock screen. You may just have to be patient. Try going into the AVD manager and starting it manually.
I have done all the installation and have my hello world.But when I run my app, the AVD gets started but stays blank with android on it.
Please help, am on ubuntu 10.04 using eclipse.
Great tutorial. However it’s a bit out-of-date. Here’s a more updated version of installing sdk: http://goo.gl/BD9OG
the procedure is correct but the download from google is soooooo damn slow this will take about 3 hours at this rate
it sucks
Hello allafter installing SDK android then the Eclipse;
when i made install a new software inside elcipse a message appears after downloading about 50 % of the packages
“Cannot complete the install because one or more required items could not be found.
Software currently installed: Shared profile 1.0.0.1319176397402 (SharedProfile_epp.package.java 1.0.0.1319176397402)
Missing requirement: Shared profile 1.0.0.1319176397402 (SharedProfile_epp.package.java 1.0.0.1319176397402) requires ‘org.maven.ide.eclipse [1.0.100.20110804-1717]‘ but it could not be found”
thanks for the help
Anas
Solved - thanks
Glad you got it fixed, what was the problem..?
Sorry, only I run the program as admin
Thanks
You were running as admin or you are running as admin? Either way I’d not advise it
Cannot complete the install because one or more required items could not be found.Software being installed: Android Development Tools 14.0.0.v201110171935-205994 (com.android.ide.eclipse.adt.feature.group 14.0.0.v201110171935-205994)
Missing requirement: Android Development Tools 14.0.0.v201110171935-205994 (com.android.ide.eclipse.adt.feature.group 14.0.0.v201110171935-205994) requires ‘org.eclipse.wst.sse.core 0.0.0′ but it could not be found
Help :’( i’m newbie on Ubuntu
I’ve not encountered that one but it looks like it’s not an uncommon issue. Fortunately it should be easy to fix, take a look here [http://code.google.com/intl/es/eclipse/docs/faq.html#wstinstallerror] and let me know how you get on.
Thanx for this post Really helpful
Thanks for the article. Seems that that Android SDK manage has a new look in its latest version. See http://developer.appcelerator.com/blog/2011/10/googles-new-android-sdk-tools-revision-14.html for a write-up.I had to go back and install Android SDK Platform-tools after installing the APIs. Seemed to work after that.
@John,
Well would you believe it …. I got the same error! Weird I don’t remember that last time.
However, the solution (for me) was to select ‘Clean’ from the ‘Project’ menu. The error disappeared and that was that.
Hope this helps but if not then I can bundle this project in a zip and send it on over.
Thanks for the link, although I don’t see that much has changed apart from you using Ubuntu 11.04. Things go out of date pretty quickly and leave posts like this (and yours) behind, I will try to keep it up to date but it’s easier said than done
To add the ADT via zip NOT the web link as this forces install of v18 and fails, you will need to find a copy of ADT-15.0.1.zip and install from archive in eclipse…using the hel install method described earlier
I am getting a 404 not found fromthe jaunty web page you recommended.
Do you have any other ideas?
Thank You For the post. I am finally able to install android sdk with eclipse after so many unsuccessful attempts
you may have success if you add the repository via the synatptic package manager instead.
for Ubuntu v. precise pangolin:
Applications -> System Tools -> Administration -> Synaptic Package Manager
or can launch synaptic from the terminal bu issuing the command:
gksudo synaptic
once you have launched synaptic, please look in the settings menu and select repositories.
you should look at the tabs in this menu, and select a dependency-containing repository from the available options.