
Using Fonts for Icons in Xamarin.Android
mobile-development xamarin Where do mobile developers get their #android icons from? You know, those in the menu like "ic_menu_gallery". I'm creating a new project with a NavDrawer and want to swap out those added by the template. Free or paid (within reason) #xamarin
— On The Fence Dev 🏴🇺🇦 (@OnTheFenceDev) March 2, 2020
I’m currently working on a new privacy application for Android and in a previous post I guided you from the Xamarin.Android Drawer Navigation project template to something that actually worked (as in you could actually use the pretty navigation provided by the template).
Now I wanted to change the menu items to something more relevant with some appropriate icons – I mean, how hard can that be right? Well, as with everything in development these days – things are not always as easy as they seem to be. The source code from the previous post can be found on Github and if you take a look you will find the menu defined within an XML file at ..\Resources\menu\activity_main_drawer.xml. A number of items are defined here with the same basic attributes:
<item
    android:id="@+id/nav_camera"
    android:icon="@drawable/ic_menu_camera"
    android:title="Import" />
So, all I need to do is to change the android:icon attribute to point to the drawable I want ….. and that’s where the “fun” started.
If you’ve worked with drawables in Android you will know that you need multiple versions of the same graphic at different resolutions. This will allow different devices, with different screen resolutions to display the appropriate graphic. You can find more information here: https://developer.android.com/training/multiscreen/screendensities#TaskProvideAltBmp.
If you look at the above article you will see that five different resolutions (screen densities) listed – that means you need five versions of each of your graphics for your app (although there are instances where you can get away without all of them).
There are online tools to perform the generation for you but the resulting assets still need to be extracted and copied into the project.
Then comes the small matter of what icons to use – and where to get them from.
Android comes with built-in icons, like the ic_menu_camera asset in the above menu item. But finding a list of these isn’t, as I’ve found, that easy and Google recommend copying the icons you need (at all require screen densities) into your project and not to rely on them being present on any particular users device.
So, is there a better way?
Well, as the title of this post eludes, we can use fonts instead – yes, you read correctly … Fonts!
After a little bit of searching I found a blog post by James Montemagno in which he describes using the FontAwesome font in Xamarin.Forms projects.
Well, I’m not using Xamarin.Forms, I’m using Xamarin.Android but if one can do it then surely the other can too.
After a little bit of Googling (actually Duck Duck Go) I stumbled on a post by Joan Zapata where he presents updates to his Iconify library for Android.
Checking out the Readme on Github it certainly looked like this was the answer to my problems, there was just one wrinkle – it was written in Java.
No problem you say – just man up, roll up your sleeves and create a Library Binding project. Yes, I could do that – or I could see if someone else had already ported it over to Xamarin – which of course they had.
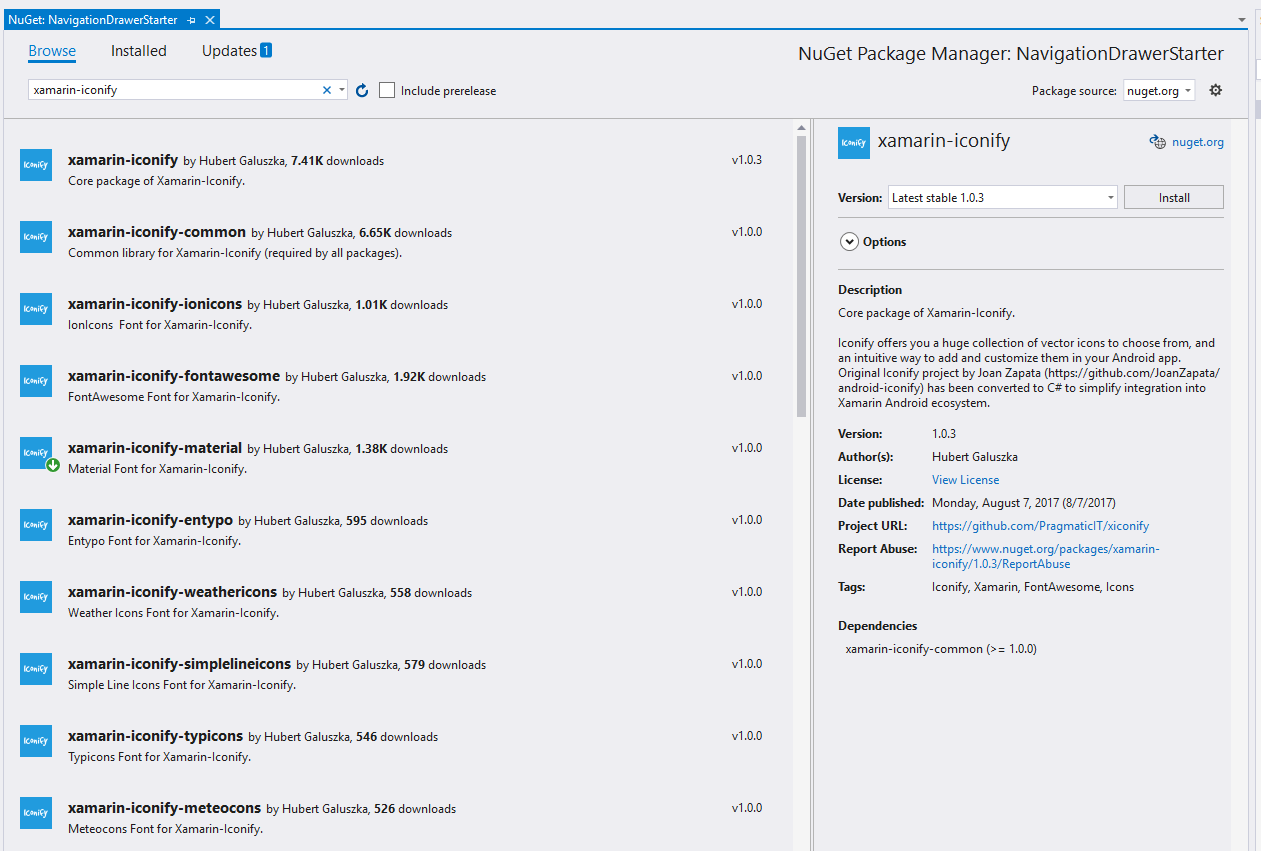
If you head over to https://github.com/PragmaticIT/xiconify you will find the source and can dig through it at your leisure – but the Readme points to a nuget package which can be easily installed into your project, so that’s what I did and as you can see from the image below, I selected to ‘Material Design’ package.
Once the package is installed it needs to be initialised in the applications Main Activity:
protected override void OnCreate(Bundle savedInstanceState)
{
	base.OnCreate(savedInstanceState);
	Xamarin.Essentials.Platform.Init(this, savedInstanceState);
	SetContentView(Resource.Layout.activity_main);
	Android.Support.V7.Widget.Toolbar toolbar = FindViewById<Android.Support.V7.Widget.Toolbar>(Resource.Id.toolbar);
	SetSupportActionBar(toolbar);

	Iconify.with(new MaterialModule());

	.
	.
	.
	.
	.
}
To replace the menu icons all we need to do is fetch a reference to each of them and call SetIcon passing in the required IconDrawable provided by the new package:
var myMenuItem = navigationView.Menu.FindItem(Resource.Id.nav_camera);
myMenuItem.SetIcon(
	new IconDrawable(this,
					 MaterialIcons.md_message.ToString()
					 )
					.color(Color.Gray));
The result will look like this:
![]()
The great thing about this is that the font will scale as required without getting blocky – I don’t need to do anything more.
The Readme for the Xamarin ported version of Iconify also provided details for adding Font Icons to your XAML and even how to create your own Icon Packs.
So there you have it – a simple way to replace your icons with scalable fonts, doing away with the need to provide versions for each screen density.
Comments
Comments are now closed4 responses
Hi! thank for this article! is awesome. But, ¿what do you prefer? ¿vector asset or font asset for Icons in Xamarin.Android?
¿Pros and Cons for each?
I want to know your opinion.
Regards.
Claudio
For me I think fonts are preferable due to the reduced file size but it really depends on the scenario. Most developers know that SVG graphics will scale to any size without any pixelation etc but then fonts will pretty much do the same thing so I’m all for fonts myself.
I got an error in this line:
var myMenuItem = navigationView.Menu.FindItem(Resource.Id.nav_camera);Couldn’t reference my ImageView (where I want the icon to be).
Tried this but didn’t worked:
var MyIcon = FindViewById(Resource.Id.ImgLogo);Hi Kenny – are you working off the solution from the previous post? I’ve just pulled that, applied the changes in this post and it everything worked as expected.
If you want to post some more code I’ll happily take a look to see what’s going