Creating a Simple Modal Dialog Form for Xamarin.Forms
mobile-development xamarin smite-scoreboard-app I’ve finally managed to get some time to look at the Smite Scoreboard application that I’m using as a vehicle to dive into Xamarin.Forms (XF) and it’s been a fraught time (see bottom of post).
Between incompatible nuget packages, mismatched Windows and iOS configurations and finding that XF didn’t actually support what I wanted to do I was pretty close to saying, “you know what, to hell with it – I’ll just use the native Xamarin approach instead”.
However, I recalled a video by John Sonmez titled ‘Why does Programming Suck?’ and rolled my sleeves up and dug in again. Anyway – getting back to the Smite Scoreboard app and what is basically the first User Story.
As a user I want to be able to create a list of players, adding, editing and removing as appropriate.
Now, I know what I wanted to do to implement this story – a simple ListView with an ‘Add Player’ button which would open a modal dialog . The dialog would contain a ‘Player Name’ field with OK and Cancel buttons. Entering a name and tapping OK would add a new row to the ListView. Simple huh.
Well no, not really. While XF does support modal pages, which take up the whole screen, it does not support modal dialogs.
I tried a couple of approaches including the creation of a layout with an Entry field above the ListView which would replace the field I was going to put in the dialog. I had this partly implemented but really didn’t like how it was working and decided to bite the bullet and find a way or make a way!
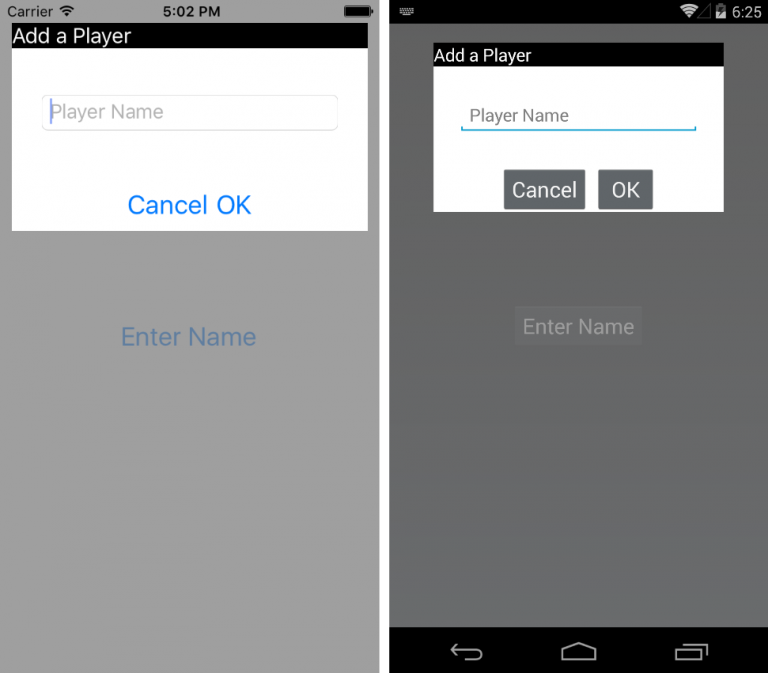
And this is what I came up with (iPhone on the left, Android on the Right):

Yes – it’s not pretty but it shows me that I can do what I want to be able to do. Making it look nice is a job for later, lets get it working first ?
So, on to the code. I decided to address the initial problem – how do I create a modal dialog (or the impression of a modal dialog) which will allow data entry? I didn’t worry about the ListView integration as I’m happy enough that I can make this work.
I found the key in Charles Petzolds book (which is free) and simply extended his solution to my needs.
Basically he uses an AbsoluteLayout which will hold the ‘normal’ page elements as well as a ContentView which will form an overlay that the user can see through but crucially not tap through. The ContentView is initially loaded with it’s IsVisible property set to false.
The skeleton xaml file looks like this:
<AbsoluteLayout>
  <!-- Normal Page Content -->
  <StackLayout AbsoluteLayout.LayoutBounds="0, 0, 1, 1"
               AbsoluteLayout.LayoutFlags="All">
      <!-- Normal Page Content -->
  </StackLayout>
  <ContentView x:Name="overlay"
               AbsoluteLayout.LayoutBounds="0, 0, 1, 1"
               AbsoluteLayout.LayoutFlags="All"
               IsVisible="False"
               BackgroundColor="#C0808080"
               Padding="10, 0">
      <!-- Overlay -->
  </ContentView>
</AbsoluteLayout>
With this in place I added a button to the StackLayout and bound the Click event to a handler in the code behind which flipped the IsVisible property of the ContentView to True, thus displaying the overlay.
All I had to do now was to create a layout within the ContentView which looked something like a dialog. I came up with this:
<StackLayout Orientation="Vertical"
             BackgroundColor="White"
             HeightRequest="175"
             WidthRequest="300"
             HorizontalOptions="Center"
             VerticalOptions="Start"
             Margin="0,20,0,0" >

  <Label BackgroundColor="Black"
         FontSize="18"
         TextColor="White"
         HorizontalOptions="Fill"
         Text="Add a Player" />

  <Entry x:Name="EnteredName"
         Placeholder="Player Name"
         TextColor="Black"
         VerticalOptions="CenterAndExpand"
         HorizontalOptions="Center"
         WidthRequest="250" />

  <StackLayout Orientation="Horizontal"
               HorizontalOptions="Center">

    <Button Text="Cancel" FontSize="Large"
                VerticalOptions="CenterAndExpand"
                HorizontalOptions="Center"
                Clicked="OnCancelButtonClicked"/>

    <Button Text="OK" FontSize="Large"
                  VerticalOptions="CenterAndExpand"
                  HorizontalOptions="Center"
                  Clicked="OnOKButtonClicked" />
  </StackLayout>

</StackLayout>
Wiring the buttons up to flip the IsVisible property of the overlay back to false and, in the case of the OK button, access the entered value was straightforward enough.
using System;
using Xamarin.Forms;

namespace SimpleOverlayForm
{
    public partial class Home : ContentPage
    {
        public Home()
        {
            InitializeComponent();
        }

        void OnButtonClicked(object sender, EventArgs args)
        {
            EnteredName.Text = string.Empty;
            overlay.IsVisible = true;
            EnteredName.Focus();
        }

        void OnOKButtonClicked(object sender, EventArgs args)
        {
            overlay.IsVisible = false;
            DisplayAlert("Result",
                          string.Format("You entered {0}", EnteredName.Text), "OK");
        }

        void OnCancelButtonClicked(object sender, EventArgs args)
        {
            overlay.IsVisible = false;
        }
    }
}
The result may not be pretty right now but I think it will suffice for the time being until I can get to grips with theming etc.
The full source code can be downloaded from GitHub
It should be noted that I had issues when I attempted to update to the latest version of Xamarin.Forms via Nuget. The version installed with the ‘File > New Project’ did not seem to like the Overlay configuration and while the semi-transparent background was visible the ‘dialog’ controls were not. Only by updating from 2.0.0.6482 (installed by default) to 2.3.1.114 (latest at time of writing) was I able to get this working. But it was not that simple (of course). Version 2.3.1.114 has dependencies on specific version of the Xamarin.Android.Support packages, 23.3.0, but I’d already updated those packages to their latest versions (23.4.0.1). This meant that I had to revert those updates and install 23.3.0 instead.

Comments
Comments are now closed0 responses