AppSettings in Xamarin.Forms
xamarin xamarin-forms mobile-development If you have used ASP.NET in recent years you will probably be familiar with the appSettings.jsonfile and it’s associated, build-specific transformations, e.g. appSettings.development.json and appSettings.release.json.
Essentially these allow developers to define multiple configuration settings which will be swapped out based on the build configuration in play. Common settings are stored in the main appSettings.json file while, for instance, API Endpoint Urls for development and production deployments are stored in the development and release files.
At compile-time any values specified in the deployment version of the file overwrite those in the common version.
Simple – works well and we use it all the time without thinking about it. But what about Xamarin.Forms – it doesn’t have such a mechanism out of the box so how do we achieve this and prevent accidentally publishing an app to the App/Play Stores which are pointing to your development/staging servers?
The Problem
Previously I have tried a number of approaches and while they mainly worked there were always shortcomings which meant that I couldn’t really rely on them.
One used a pre-deployment step in Visual Studio to copy the appropriate file, based on the build configuration, from one location to another where it would be picked up by the applications startup code. This worked fine when running on Windows but not when building on the Mac (using Visual Studio for Mac) because it uses the cp command and not copy.
Yes, I could have created an alias from copy to cp but what about when I want to configure a Continuous Integration build on Azure DevOps?
Another approach had me creating Operating System specific script files, .bat on Windows and .sh on the Mac, and again using a pre-build task to run the appropriate script (executing the extension-less command would run the appropriate version on each platform). But passing arguments for the build configuration was clunky and again Azure DevOps pipelines didn’t really seem to want to play ball – maybe Microsoft is a bit cautious about letting anyone execute scripts on their Azure servers 😉
Well, after deploying and testing the wrong version of an app onto my phone and scratching my head for twenty minutes I decided enough was enough and using the first approach above as a base I have come up with a simple mechanism which does the job.
The (my) Solution
The solution I’m running with requires a configuration file to be created for each build configuration, e.g. Debug and Release (by default), which are configured as ‘Embedded Resources’.
A static property is added to the App class which implements the Singleton pattern to load and return an instance of a class that represents the contents of the configuration file – I’m using Newtonsoft.Json to deserialise the file and hydrate an instance of the class.
Add some Conditional Compilation Symbols to the mix and we are just about there.
If you would rather look at the code in Visual Studio then you can download it here download it here.
Enough talk – let’s get to it 😉
To the Code
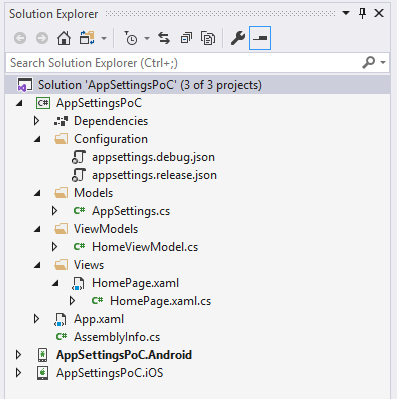
I’ve created a basic Xamarin.Forms project using Visual Studio 2019 Community Edition, stripped out all the default stuff and added in a single Content Page, ViewModel, Class and two Configuration Files:
The appsettings.debug.json file has the following content:

You probably don’t need any clues to the content of the other version 😉
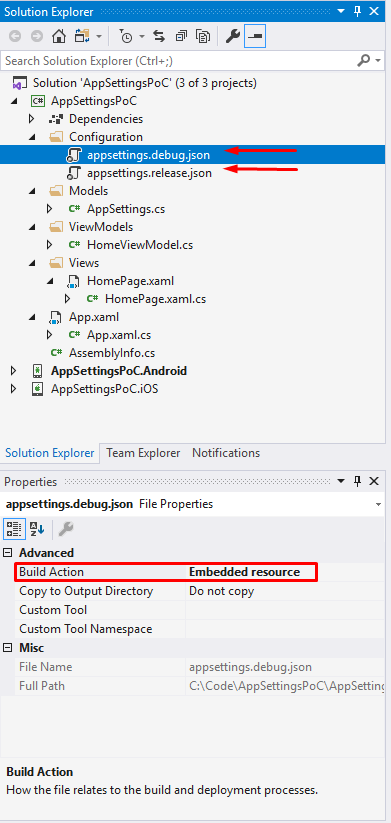
The only thing to remember here is to ensure that you set the ‘Build Action’ for these files as ‘Embedded Resource’:
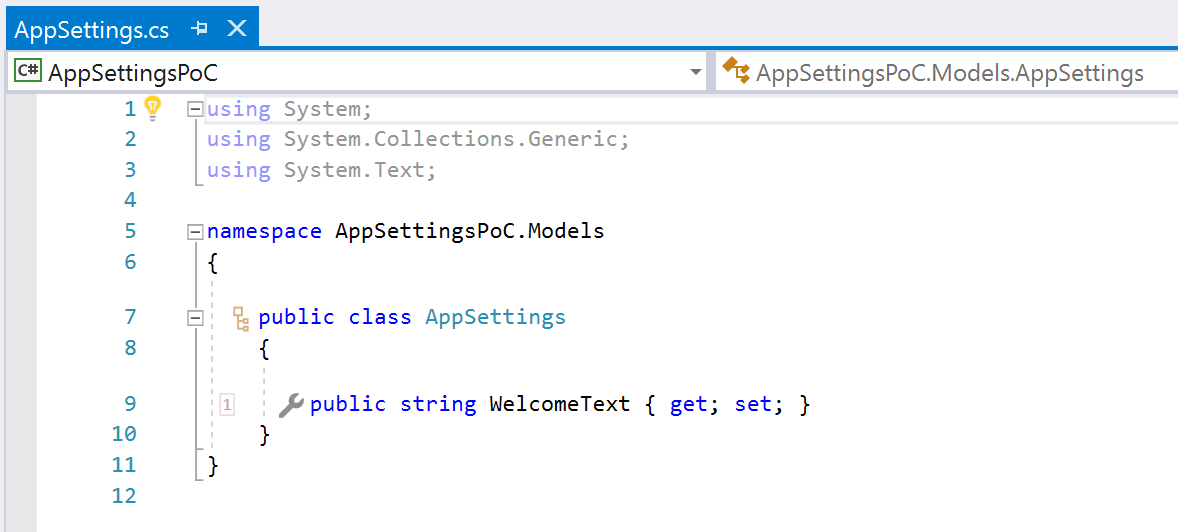
The AppSettings.cs class is a simple POCO with a single property which corresponds to the json files:
Now, when a Xamarin.Forms app starts up the App class is, for all intents and purposes, the entry point and is generally available to the Content Pages throughout the app. So this is a good place to expose our AppSettings:
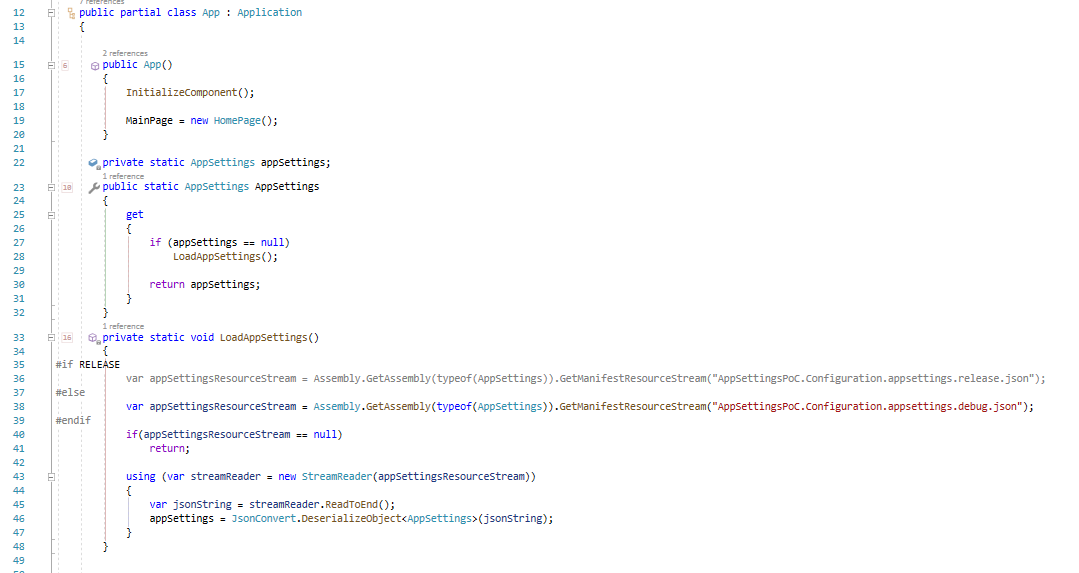
Notice how the property getter will instantiate the AppSettings instance if it is not already in place.
Also notice the use of the conditional compilation statements (#if .. #else .. #endif) in the LoadAppSettings method. This is where the ‘magic’ happens. I know that some people may shy away from this approach but this is the way I’ve gone for now.
Basically the LoadAppSettings method will read in the specified file depending on which build configuration is in play at the time. The file is deserialised into an instance of AppSettings and the local variable updated.
As the .json files are Embedded Resources we can address them using their fully qualified names, noting that the namespace is made up of the overall Namespace (AppSettingsPoc), the folder name containing the files (Configuration) and the actual filenames. Yours will be different for sure – just remember how it’s comprised.
For the conditional compilation to work we need to specify the appropriate symbols (the ‘RELEASE’ text in the above code).
To do this, Right-Click on the shared project (the one with the App.xaml file) and select ‘Properties’:
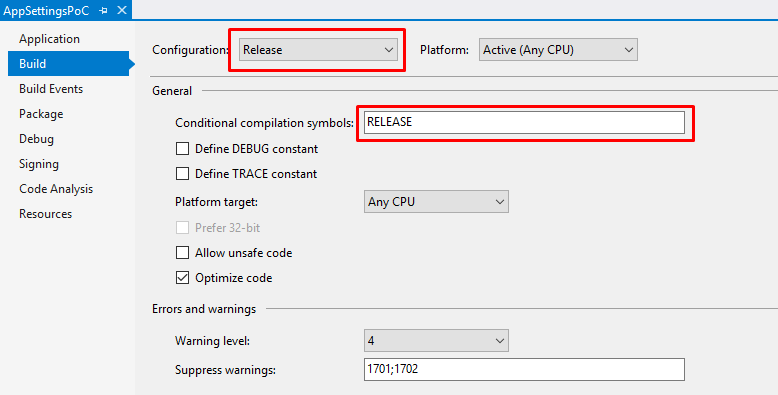
Select the ‘Build’ tab from the left hand side and set the configuration to ‘Release’ if it’s not already.
In the ‘Conditional Compilation Symbols’ field enter ‘RELEASE’ (or whatever you want to call it – just match it up with what you use in the App.xaml.cs file). If there are other values already present then tag this new one to the end, delimiting it with a semi-colon.
So, we have the configuration files, we are loading them and making the available to the Application. Now we just need to consume the data and for this I’m using a ViewModel, HomeViewModel.cs, which will be the Binding Context to our Page.
The ViewModel class is another simple POCO with a single property which reads the WelcomeText from the AppSettings instance via the App class:
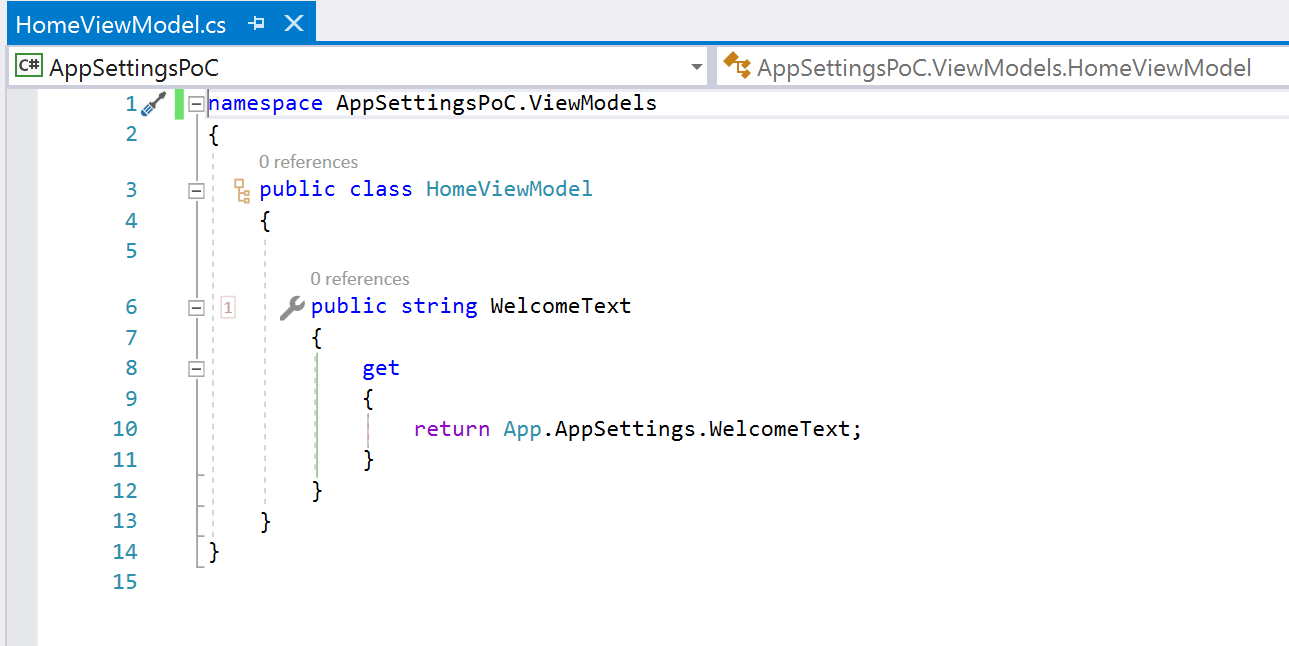
Finally, we just need to bind this property to a UI element on our Page:
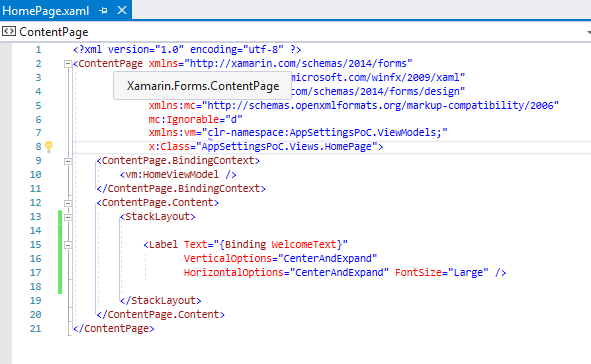
Notice that on line 10 in the above markup I’m specifying the BindingContext to an instance of the HomeViewModel. As with many things in Xamarin.Forms, there are numerous ways of acheiving this.
The label has a Text property which I’ve bound to the WelcomeText property (which will be on the ViewModel remember) and that’s about it.
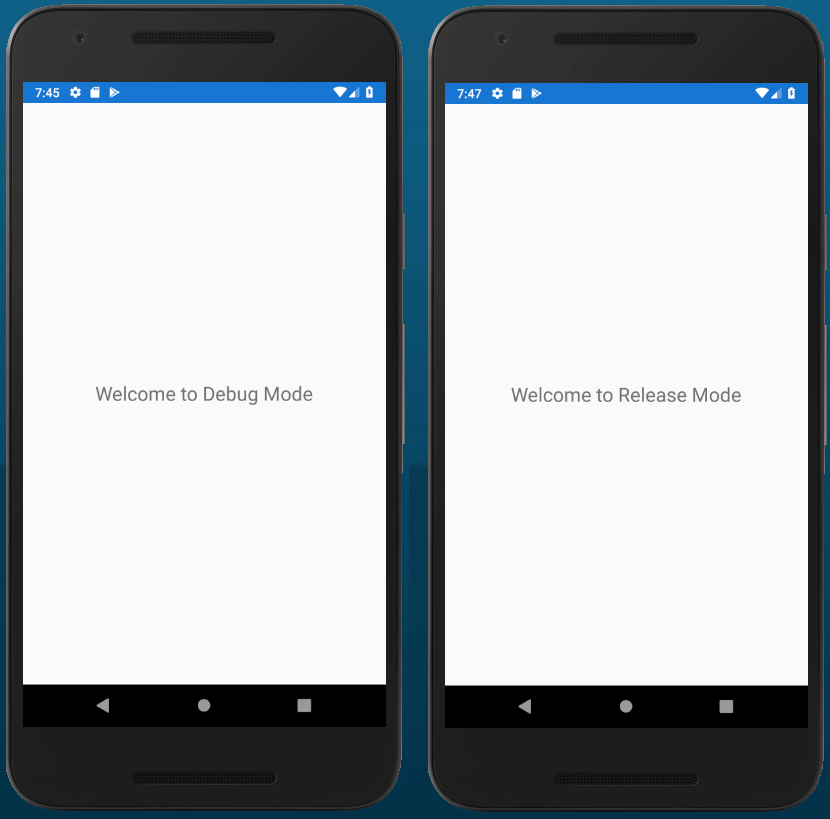
If I run the app in Debug mode I will see the message as read from the appsettings.debug.json file. Run it in Release mode and it will be the message from the appsettings.release.json file:
In Summary
The solution presented above requires a small amount of setup and then it pretty much fire-and-forget. If you need a new setting then update your AppSettings.cs class, add the values to your .json files and you are good to go.
Need a new build configuration, say Staging? No problem. Just create the new .json file (remembering to set it’s build action as ‘Embedded Resource’), add a new ‘STAGING’ symbol to the project properties, update the LoadAppSettings method to check for it and you are done. Simple as that really.
Now, some may say that Conditional Compilation is bad and that using Reflection is the work of the Devil. But frankly – I’m quite pragmatic about these things and if it works and doesn’t have a dreadful code smell then I’m not going to lose too much sleep over that.

Comments
Comments are now closed7 responses
Hello,
Your example doesn’t work for me as in the App.xaml.cs I am getting the following error:
it occurs on the public static AppSettings AppSettings line
Inconsistent accessibility: property type ‘AppSettings’ is less accessiable than property ‘App.AppSettings’
That’s odd – I’ve just downloaded the project from the link in this post and built it as is using VS2019 on Windows 10 with no problems.
Fantastic idea – thank you so much! There is one question that’s been bothering me for several minutes now: why wouldn’t you reverse the #if compiler condition from RELEASE that doesn’t exist to the DEBUG that does exist by default?
..oh, the Log in with Google fails to return control to your page in Safari after authentication popup disappears on macOS (Catalina), so I had to install Chrome in order to post. Just a feedback.
In my real life implementations I normally have three configurations, Release, Staging and Debug so that’s probably why I habitually define the additional RELEASE and STAGING symbols. If you just have the two then yes, no need to overcomplicate things so just use the built-in DEBUG one.
Thanks for the heads up on the Login with Google issue – the site is hosted by WordPress.com so I’ll see if I can replicate it and raise a support ticket.
This is fantastic. Although as you say, is using reflexion. Is not a big deal is this case. But another solution like this but without reflection:
you can have an interface with the properties you want to configure and implement this interface for each environment.
Then, if you have dependency injection, you can inject the interface with the implementation, depending you environment. And that’s it, you can access to the parameters of you environment wherever you need.
To end with, if the repository is public, you should add this files to .gitignore.
Both solutions are totally fine, but the more you avoid reflection on xamarin projects, the better.
Thanks for the feedback – there’s always more than one way 😉
Great! Exactly what I needed. it’s nearly 2022, not sure if there are better ways of storing configuration now since this article is from 2019, if so, hit me up 🙂