
Using Client-Side jQuery to Send Data to Server-Side .NET
asp-net javascript jquery Back in March 2009 I wrote a blog post about calling code-behind methods using Javascript and while looking at my Google Analytics recently I was surprised to see that this post still receives about 650 hits a month. Why am I surprised? Well the post is almost three years old now and with technology moving on at a rapid rate there are much better (i.e. easier and cleaner) ways of sending data from the client to the server. In this post I’ll demonstrate just one of them which uses jQuery and a standard ASP.NET web application, i.e. not MVC although there is no reason why this approach will not work just as well there as well. The original code was taken from a DotNetNuke module I wrote to add geocoding functionality to blog posts. The user would locate their position on the map and when the post was saved the coordinates would be sent back to the server and associated with the it. The issue at the time was that I was using Virtual Earth for my mapping and as it was not a server-side .NET control but generated by a Javascript library on the client it was not a simple case of writing
long latitude = map.Latitude;
While working on a recent contract I was using the Google Maps API and jQuery on the client with ASP.NET user controls written in C# on the server and was surprised how easy it was to hook everything up.
In case you experience any problems (if I don’t explain something well enough or miss something out) I’ve uploaded a fully working VS2010 solution to this post.
After creating a standard ASP.NET Web Application using Visual Studio there are a couple of things that need to be done before we can get started.
When Visual Studio created the project it placed three jQuery files in scripts folder – but these are now out of date and we will be using functionality which is not available in these older versions.
- In Visual Studio expand the Scripts folder and delete the three files it contains
- Download the latest version of jQuery from https://jquery.com/download/
- In Visual Studio, Right Click on the Scripts folder and select ‘Existing Item’ from the ‘Add’ menu
- Locate the jQuery file you downloaded above and click ‘Add’
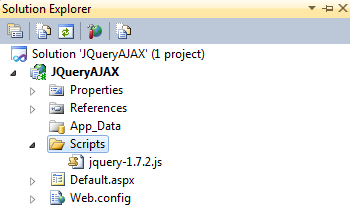
Your Solution Explorer should look something like this:
With the latest version in our solution we now need to reference it in our web page so that we can actually use it.
- Double-Click on the Default.aspx file in the solution explorer to open it
- Add the following line within the head tags (you may need to change the jQuery filename depending on the version you downloaded)
<script src="Scripts/jquery-1.7.2.js" type="text/javascript"></script>
While we are at it we may as well add the reference to the Google Maps API – add the following line between the head tags (you can add this as a single line)
<script "text/javascript" src="http://maps.googleapis.com/maps/api/js?sensor=false"></script>
Now to add some controls to the page. We need a div element where the map will be injected, a couple of textboxes to display the latitude and longitude and a button to trigger our save operation.
Replace the content of the body tags so that it looks like this:
<body>
	<div id="map" style="width: 450px; height: 300px;">
	</div>
	Latitude:
	<input id="txtLatitude" type="text" />
	Longitude:
	<input id="txtLongitude" type="text" />
	<input id="btnSave" type="button" value="Save Coordinates" />
	<div id="message">
	</div>
</body>
If you run the application now you will see the text fields and the button but not the Map because it’s not wired up yet – so let’s do that now.
Beneath the two script tags we added to the head add the following (I’ll explain what it’s doing afterwards):
1
2
3
4
5
6
7
8
9
10
11
12
13
14
15
16
17
18
19
20
21
22
23
24
25
26
27
28
29
30
31
32
33
34
35
36
37
38
39
40
41
42
43
44
45
46
47
48
49
50
51
52
53
54
55
56
57
58
59
60
61
62
63
64
65
66
67
<script type="text/javascript">

    // Global Variable for the Map itself
    var gmap;

    $(document).ready(function () {
        // Initialise the map
        initialiseMap();

        // Populate the Lat/Long Fields
        getCoordinates();

        // Add a Listener to the Map to trigger when the user pans the map
        google.maps.event.addListener(gmap, 'center_changed', function () {
            // Update the Lat/Long Fields
            getCoordinates();
        });

        // Attach function to Save button
        $('#btnSave').click(function () {

            // Here we will send the coordinates to the server via the CoordinateHandler page
            $.post(
                'CoordinateHandler.aspx',
                { Latitude: $('#txtLatitude').val(), Longitude: $('#txtLongitude').val() },
                function (responseText, textStatus) {
                    // This function will execute if the post was successful
                    $('#message').text('Coordinates Saved Successfully');
                })
                .error(function () {
                    // This function will execute if there was an error with the post request
                    // Note: jQuery 1.5 or higher required for this
                    $('#message').text('There was an Error');
                });
        });
    });

    // Initialise and configure the map
    function initialiseMap() {

        // Options array to set the initial center point, zoom level and map type.
        var myOptions = {
            center: new google.maps.LatLng(53.8693, -1.4941),
            zoom: 4,
            mapTypeId: google.maps.MapTypeId.ROADMAP
        };

        // Initialise the map and send it to the map div
        gmap = new google.maps.Map(document.getElementById("map"), myOptions);

        // Place Crosshairs Marker in centre of map
        var marker = new google.maps.Marker({
            map: gmap,
            icon: 'cross-hairs.gif'
        });

        marker.bindTo('position', gmap, 'center');
    }

    // Update the Coordinate fields with the current map center-point values
    function getCoordinates() {
        var centre = gmap.getCenter();		// Will return a LatLng object
        $('#txtLatitude').val(centre.lat());
        $('#txtLongitude').val(centre.lng());
    }

</script>
You’ll notice that on line 54 we refer to an image called cross-hairs.gif which is not currently in our solution. You can download the one I’m using from here and then add it to the root of the project in the same way as you did with the jQuery file earlier (just right-click on the main project file rather than the Scripts folder).
Lines 6-36 form the jQuery .ready function which will be executed when the page DOM has fully loaded. In this instance we are calling out to a Javascript function called initialiseMap which is defined between lines 39 and 58 and in itself it quite unremarkable.
The myOptions variable is essentially a JSON object which contains the following settings which will be applied to our map:
- The initial position of the center of the map – in the form of a Latitude/Longitude pair
- The initial zoom level
- The initial map type
Line 49 is where the mapping magic happens – a single line of code but this generates the map, using the options we provided, and injects it into the map div.
After that we are creating a marker in the form of the cross-hair image we added earlier. Line 32 fixes this to the center point of the map – i.e. it will remain in a fixed location while the map pans beneath it. This lets us ‘target’ a specific location on the map.
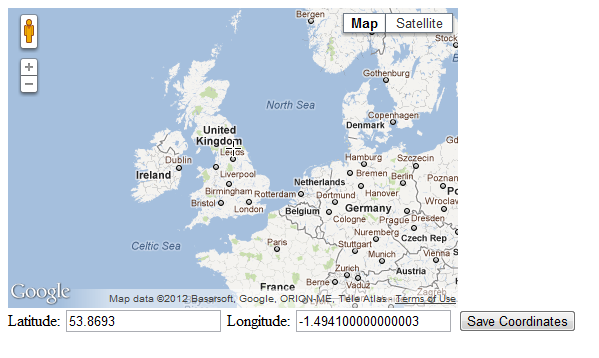
If you run the application now you should see something like this (you should be able to see the cross-hairs in the Leeds area):
You should be able to pan the map around, zoom in/out and change the map type to your hearts content but the latitude and longitude values will not update and clicking on the button won’t do anything yet.
First let’s wire up the coordinate fields to update as we pan the map. Add the following lines to the jQuery ready function beneath the call to initialiseMap.
// Add a Listener to the Map to trigger when the user pans the map
google.maps.event.addListener(gmap, 'center_changed', function () {
    // Update the Lat/Long Fields
    getCoordinates();
});
This adds a listener which will be triggered when the center coordinate of the map is changed, i.e. when we drag the map around. When it is triggered it calls the getCoordinates function – which we’ll add next.
Add the following somewhere within the script tags.
// Update the Coordinate fields with the current map center-point values
function getCoordinates() {
    var centre = gmap.getCenter();      // Will return a LatLng object
    $('#txtLatitude').val(centre.lat());
    $('#txtLongitude').val(centre.lng());
}
All we are doing here is resolving the coordinates of the maps current center point and placing the values into the appropriate fields.
Run the application now and pan the map around – you should now see the coordinate values update as you do.
So at this point we are able to pan and zoom the map around and see the latitude/longitude coordinates represented by the cross-hairs. What we want to do now is to send them to the server for processing without causing a postback.
To do this we will use the jQuery $.post function – which will, unsurprisingly, perform a POST request containing the values to the location we specify.
The first thing we are going to do is to create a server-side ‘handler’ for the POST request to call into. I say ‘handler’ because we are actually going to use an ordinary webform in this instance – just to keep things simple.
- In Visual Studio, Right-Click on the project and select ‘New Item’ from the ‘Add’ menu
- In the Add New Item dialog, select ‘Web Form’ and call it CoordinateHandler.aspx
- Click ‘Add’
Update the Page_Load event as below (you will also need to add the System.IO namespace):
protected void Page_Load(object sender, EventArgs e)
{
    if (Request.Form["Latitude"] != null && Request.Form["Longitude"] != null)
    {
        try
        {
            // Lat/Long have been specified - save them
            using (StreamWriter sw =
                      File.CreateText(Server.MapPath("/") + "coordinates.txt"))
            {
                sw.WriteLine("Latitude: " + Request.Form["Latitude"]);
                sw.WriteLine("Longitude: " + Request.Form["Longitude"]);
                sw.Flush();
                sw.Close();
            }
        }
        catch (Exception)
        {
            throw;
        }
    }
}
Nothing too scary here – we are just checking the Request to see if it contains form values for Latitude and Longitude. If so we are just going to extract them save them to a file on the server (to prove they made it from the client). Your logic will obviously be more involved but once you have the values server-side you can pretty much do as you please with them.
While we are in Visual Studio we can remove everything except the @Page directive from the CoordinateHandler.aspx markup – we don’t really need it as the page will never be displayed anyway.
All we need to do now is to wire up the Save button to perform a POST request to our CoordinateHandler and pass the values displayed in the textboxes.
In the real world you probably would not use textboxes as the user could enter anything into them and send it to the server – which is not a good idea. I’d also resolve the coordinates directly from the map at this point but I’ve left is as is just for simplicity.
Add the following lines to the jQuery ready function beneath the listener we added previously.
1
2
3
4
5
6
7
8
9
10
11
12
13
14
15
16
17
18
19
// Attach function to Save button
$('#btnSave').click(function () {
    // Send the coordinates to the server via the CoordinateHandler page
    $.post(
        'CoordinateHandler.aspx',
        {
          Latitude: $('#txtLatitude').val(),
          Longitude: $('#txtLongitude').val()
        },
        function (responseText, textStatus) {
            // This function will execute if the post was successful
            $('#message').text('Coordinates Saved Successfully');
        })
        .error(function () {
            // This will execute if there was an error with the post request
            // Note: jQuery 1.5 or higher required for this
            $('#message').text('There was an Error');
        });
});
What we are doing here is binding a jQuery $.post() function to the Save button which will send a request to the CoordinateHandler (line 5) containing the current Latitude/Longitude values (lines 7 & 8). Note that the names (and case) of the values being POSTed match those in the Page_Load of the CoordinateHandler. Lines 10-13 defines what should be done if the POST is successful while line 11-15 defines what should be done if there was an error.
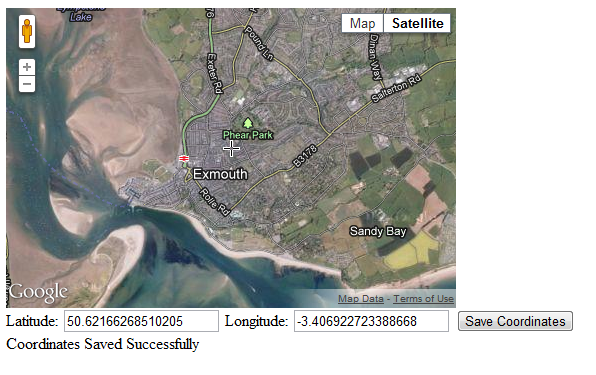
With all this in place we are ready to go – run the application and pan/zoom to a location of your choice (it will probably by your house!) and then click Save. All things being equal you should see a Success message and if you navigate to the project location you should also find a file called coordinates.txt which will contain the saved values.
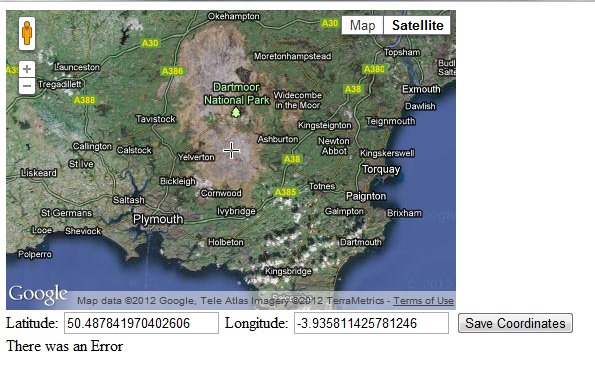
To test for an error condition we will edit the Page_Load event in the CoordinateHandler code behind file. Change the using statement for the StreamWriter so it looks like this:
using (StreamWriter sw = File.CreateText("coordinates.txt"))
By removing the Server.MapPath call the application will now try to save the file into a folder deep within Program Files – which should throw an IO Exception.
Run the application again but this time without debugging enabled, either from the Debug menu or by pressing CTRL+F5 – this will stop Visual Studio from interrupting when the exception gets thrown. This time when you click save the error message should be displayed as below.
So there we have it – a simple way to send data to the server using the AJAX capability of jQuery.
Comments
Comments are now closedOne response
Just what i was looking for works great.